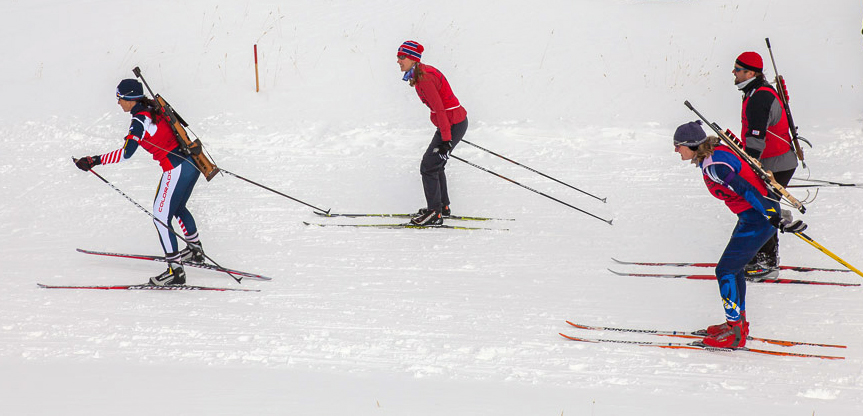
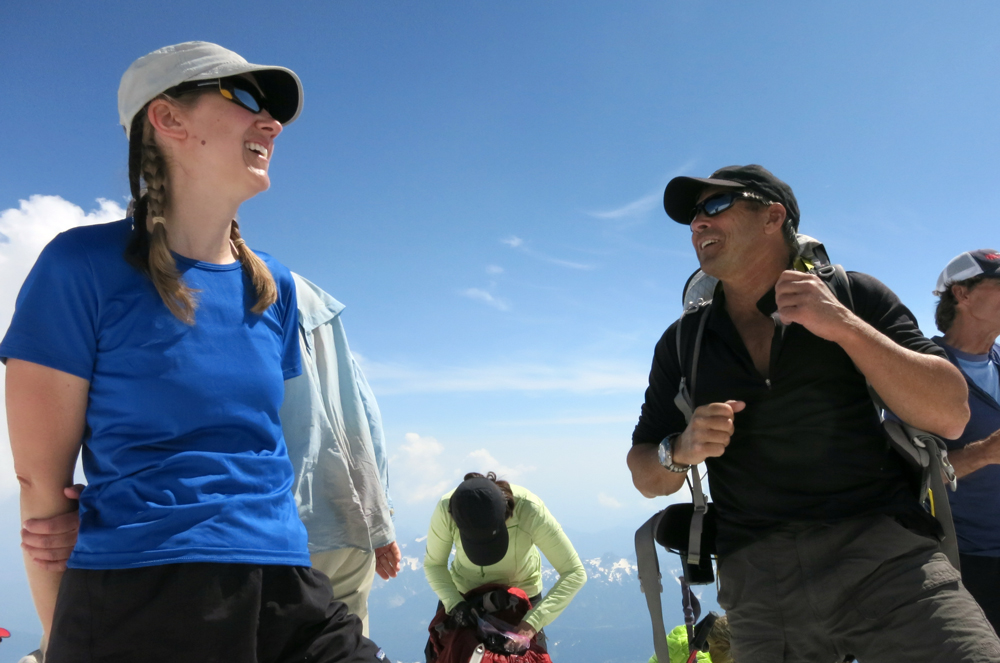
The main room of our condo during a recent vacation with Doug’s parents looked a bit like an outdoor gear store. Snowboards and skis of all sorts lined the wall and a plethora of boots sat in front of the fireplace. Closets, dressers and duffel bags overflowed with Capilene, fleece and Gore-tex clothing. During a week in the mountains near Winter Park, Colorado, we took part in two days of biathlon racing, and one day each of skate skiing, snowboarding and telemark skiing. I also managed to squeeze in some hiking and sketching in my nature journal in Rocky Mountain National Park. With so many activities on the schedule–some of which required an early start–it was hard to know when to fit in my appliance changes.
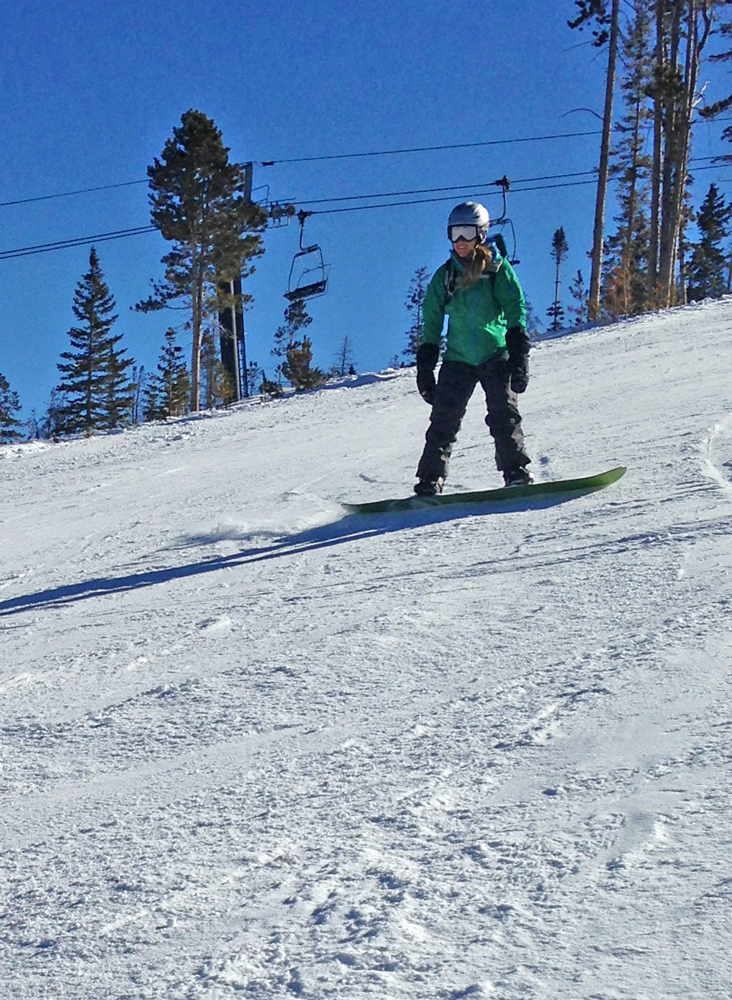
Our vacation included two days of biathlon racing. I would rather change my appliance after dinner and face the biggest volcano of ostomy output than get up at 4 a.m. to change my appliance before a race.I also put on my telemark skis after not using them for eight years (and then could barely walk for the next week.) I am trying to relearn this skill so I can use it to take trips to Colorado ski huts next winter. Stay tuned for a post in 2016 about changing your appliance in a communal ski hut.Since I could barely walk after my day of tele skiing, I opted to sit down and sketch in my nature journal for one day during the trip.My snowboard was feeling left out, so I took it out for one day on the slopes. My legs were so tired from days of non-stop winter sports, that I completely lost the ability to make my board turn after a few runs. Note to self– sliding down the entire front side of the Winter Park Resort on your heel edge is not much fun. Best to take a rest day instead.
Unfortunately, appliance changes aren’t that quick for me. Due to pretty acidic ileostomy output, I have to protect my skin with several layers of products. Stoma powder, skin prep, Duoderm, Eakin Seals and paste–I use them all. My changes usually take at least 30 minutes–sometimes longer. Even when I use all those products, my output chomps through them like a piranha if I try to go longer than three or four days, and I end up with very raw and painful skin.
The saying “simple is better” does not apply to my appliance changes. I need a lot of layers of products to protect my skin. Putting on all this stuff takes a lot of time and gives my stoma ample chances to expel output everywhere.
Those with an ileostomy know that it can be pretty hard (if not impossible) to find even a short chunk of time when your stoma isn’t pooping. Usually I try to change my appliance in the morning as that is when my stoma is the most quiet. However, on a busy ski vacation (or any time with a full schedule) that plan doesn’t always work. If I already have to wake up at 5 a.m. to make it to a race on time or catch first tracks in powder, it is hard to get up even earlier to fit in an appliance change. Also, I don’t like worrying about when I am eating and how it will impact my appliance swap. If I want to head out to a restaurant for a post-ski meal later in the evening, I go for it even if I know it will be harder to change in the morning due to the extra output. In some cases I will even switch out appliances in the evening right after a big dinner (gulp!) if that is the best way to fit it into my schedule.
If you are wondering if I have a particularly quiet and cooperative stoma, the answer is no. My stoma is a non-stop workhorse and churns out output 24/7. Fortunately, I have some tricks that allow me to change at any time of the day even when my stoma is active.
Trick number one: Marshmallows
My stoma nurse first let me in on this little secret. If I eat four to six regular-sized marshmallows about 15 minutes before a change, my stoma will usually stop outputting for about 30 minutes–just enough time to finish getting my appliance on. I can’t make any promises that it will work for you, but I recommend giving it a try. It is the only time you will get to eat marshmallows for health reasons. I have no idea why the very first individual to discover this trick was dining on marshmallows right before changing their appliance, but I sure am thankful for their sweet tooth!
This photo isn’t from our winter vacation but does show my love for marshmallows. They are most delicious when toasted over a campfire, but I will happily eat them cold before an early morning appliance change.
Trick number two: Make a hat for your stoma
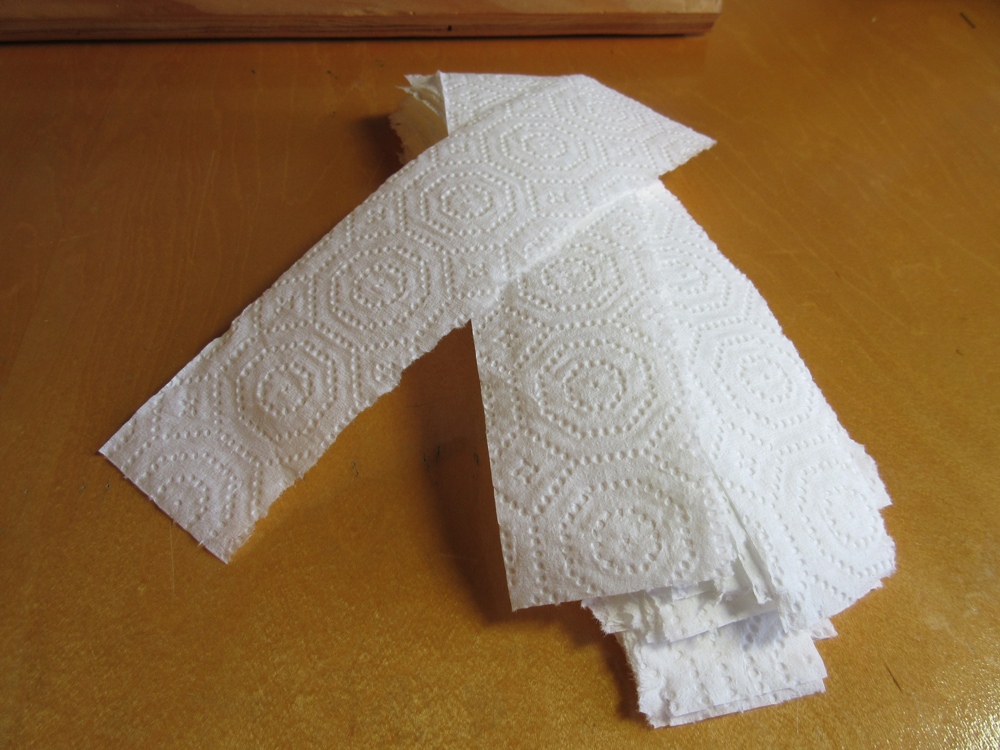
When I first got my ostomy, I absolutely dreaded changes. They were tear-filled endeavors wrought with frustration because I couldn’t get my barrier ring and wafer on without my stoma pooping all over the place and ruining the adhesives. I turned to the internet for ideas to solve this problem and discovered a post on a forum that suggested wrapping the tip of my stoma with a strip of paper towel. I gave it a try and couldn’t believe how well it worked! Plus I liked that it made my stoma look like it was wearing a cute hat.
Four years later, and I still use this method during every single change. As my stoma chugs out stool, the little hat fills up. When it has reached maximum carrying capacity, I simply pop it off, toss it in the trash can next to me, and wrap on another. Along with collecting output, the stoma hat frees up my hands to put on powder, barrier film, and all the other products that I use to protect my parastomal skin. It also keeps the base of my stoma dry as it absorbs some of the moisture from the mucous membrane.
This little trick allows me to change whenever I need to as it doesn’t matter if my stoma releases output; the hat is always there to catch it. Occasionally, if my output is profuse and watery during a change, the technique doesn’t work as well. However it is better than nothing, and if my output is watery, sometimes gulping down a few extra marshmallows will temporarily slow down the flow until I can finish the change.
I realize that making a hat for a flush stoma won’t work very well, so this trick works best if your ostomy protrudes from your belly a bit.
The only supplies needed for a stoma hat are one-inch-wide strips of paper towel.My stoma, Wilbur, models a stylish poo-catching paper towel hat. To make one, simply wind the paper towel strip around the top of your stoma and you are set to go.It is easy to slide your wafer right over the stoma when it is wearing a hat. Note that under the wafer, I have already put on my Eakin ring and other materials. If you are using a one-piece appliance, you can still use the hat method. Just pop the hat off right before you put your appliance over your stoma.All pouched up with no mess at all. For those who are wondering about the tape job, I love Convatec Durahesive wafers, but the tape irritates my skin. I cut it off and add my own strips of 3M Medipore tape. This combo adheres well through showering, swimming, and all sorts of sweat-inducing sports.
If you feel your ostomy controls your life and confines you to a certain schedule, keep searching and experimenting to find solutions. I’d never have guessed that something as simple as marshmallows and paper towel “hats” would give me the freedom to live with my ostomy on my terms rather than the whims of my stoma.
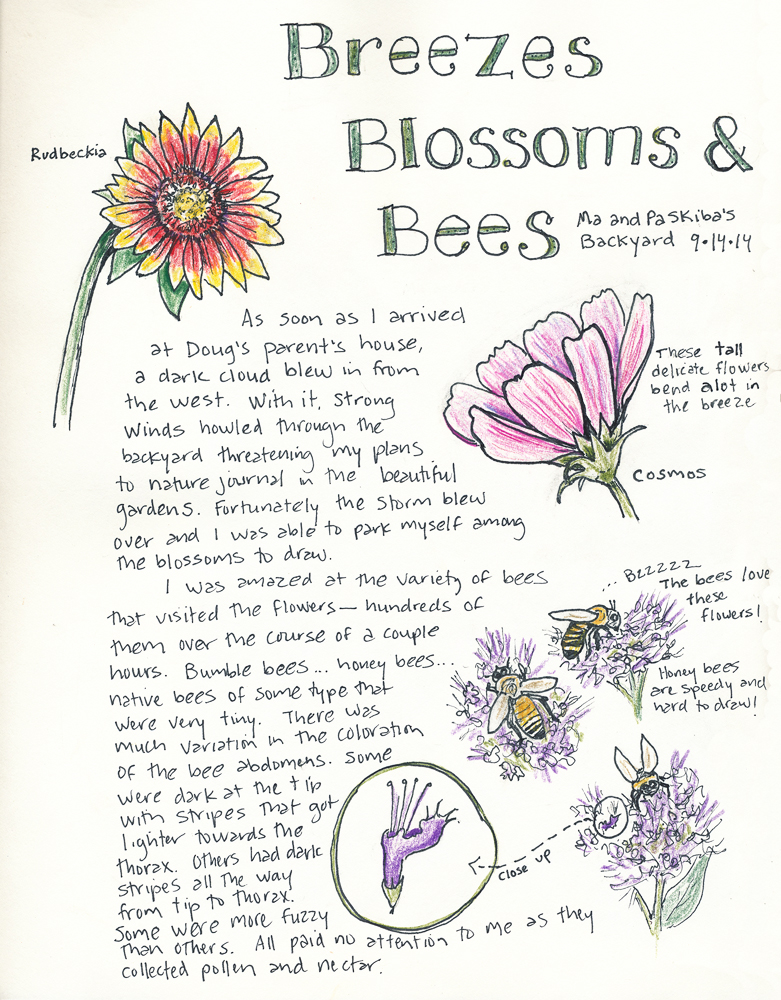
When I haven’t blogged in a while, it is hard to know where to start. I had a wonderful summer filled with a lot of fun activities and it would be impossible to cover all the happenings in a single post. Last summer I focused on the singular goal of climbing Rainier. This year I spent time doing a lot of different things including camping, rock climbing, hiking peaks, backpacking, bicycling, fly fishing, making art and visiting with family and friends. This was not the summer to get in shape or work on any specific fitness goals; it was a time to let myself bounce from paint brush to climbing hold on a whim and let go of some of the overwhelming feelings that I had been experiencing in the spring due to having too many things on my plate. I even fulfilled my dream of spending an afternoon sketching in my mother-in-law’s beautiful backyard flower garden with a glass of iced tea at my side. While I moved forward in feeling less stressed, my performance in a few sports definitely took a hit. One of those was running.
Nature journaling may not improve physical fitness, but it is definitely good for my mental health!
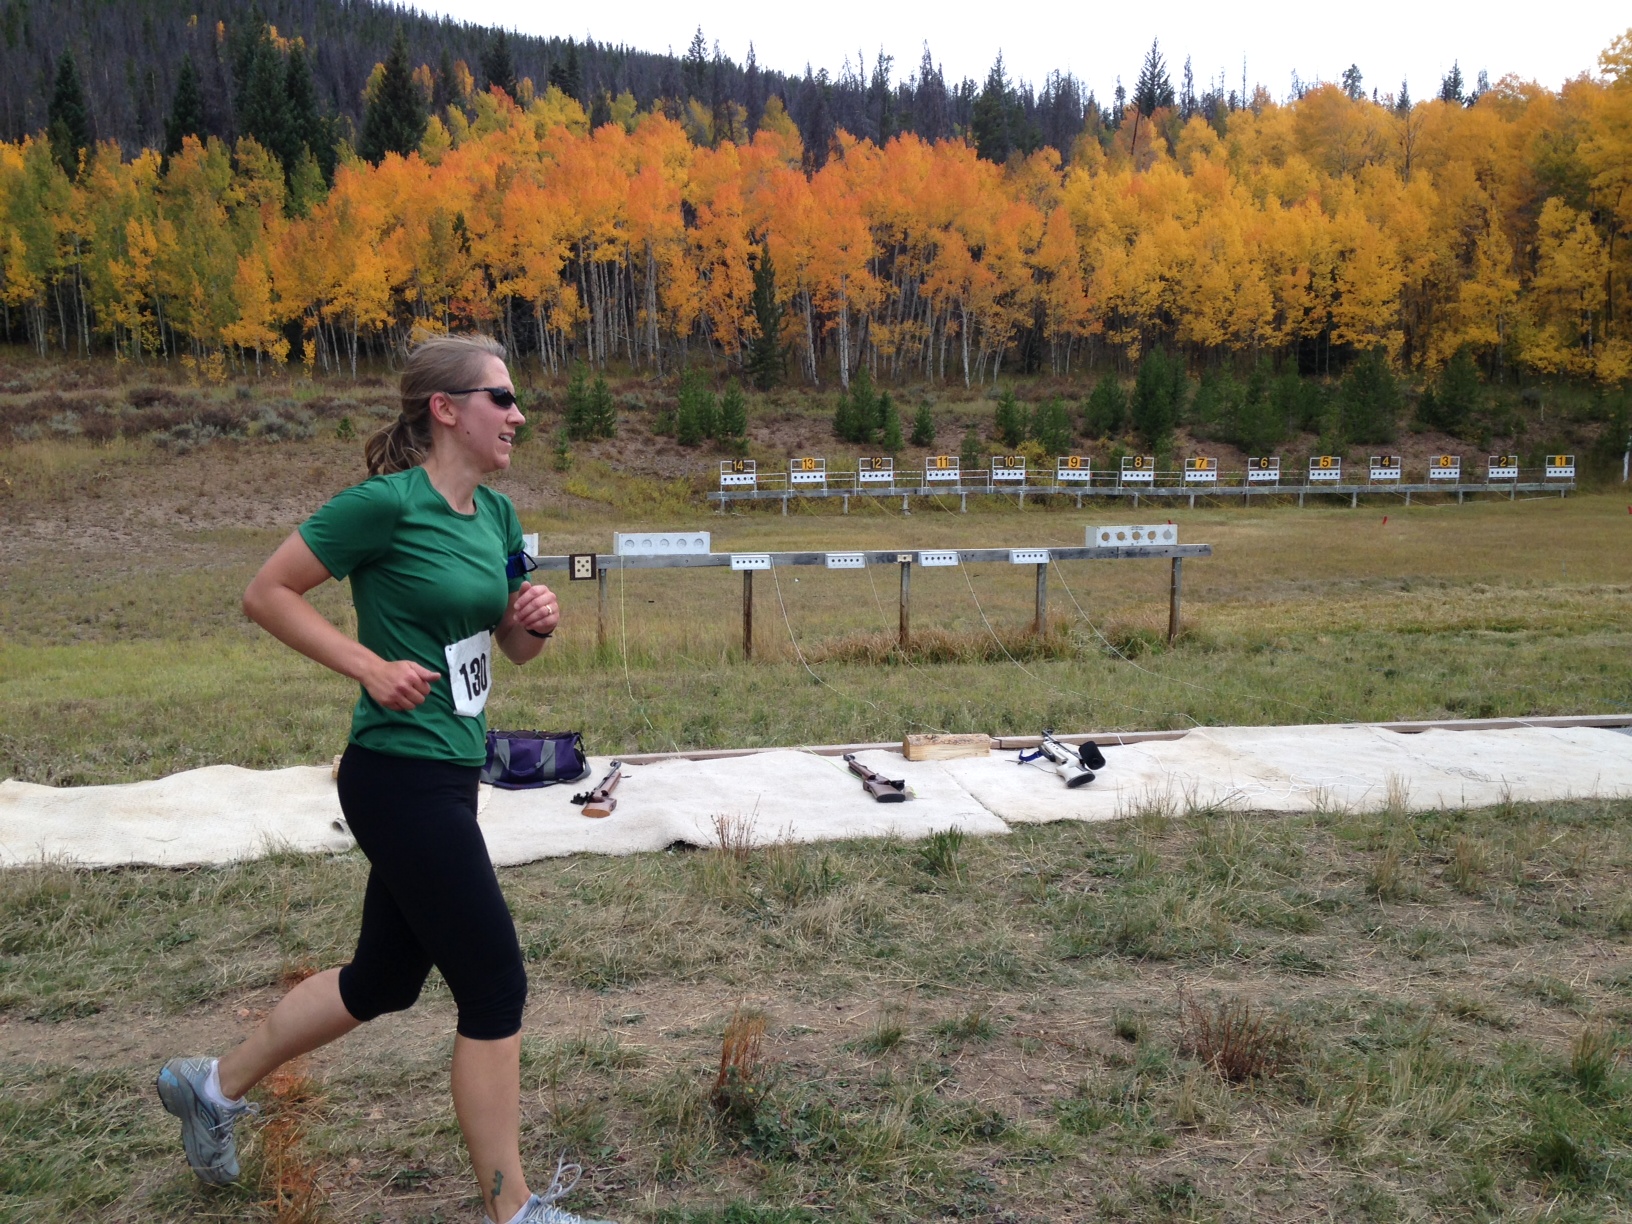
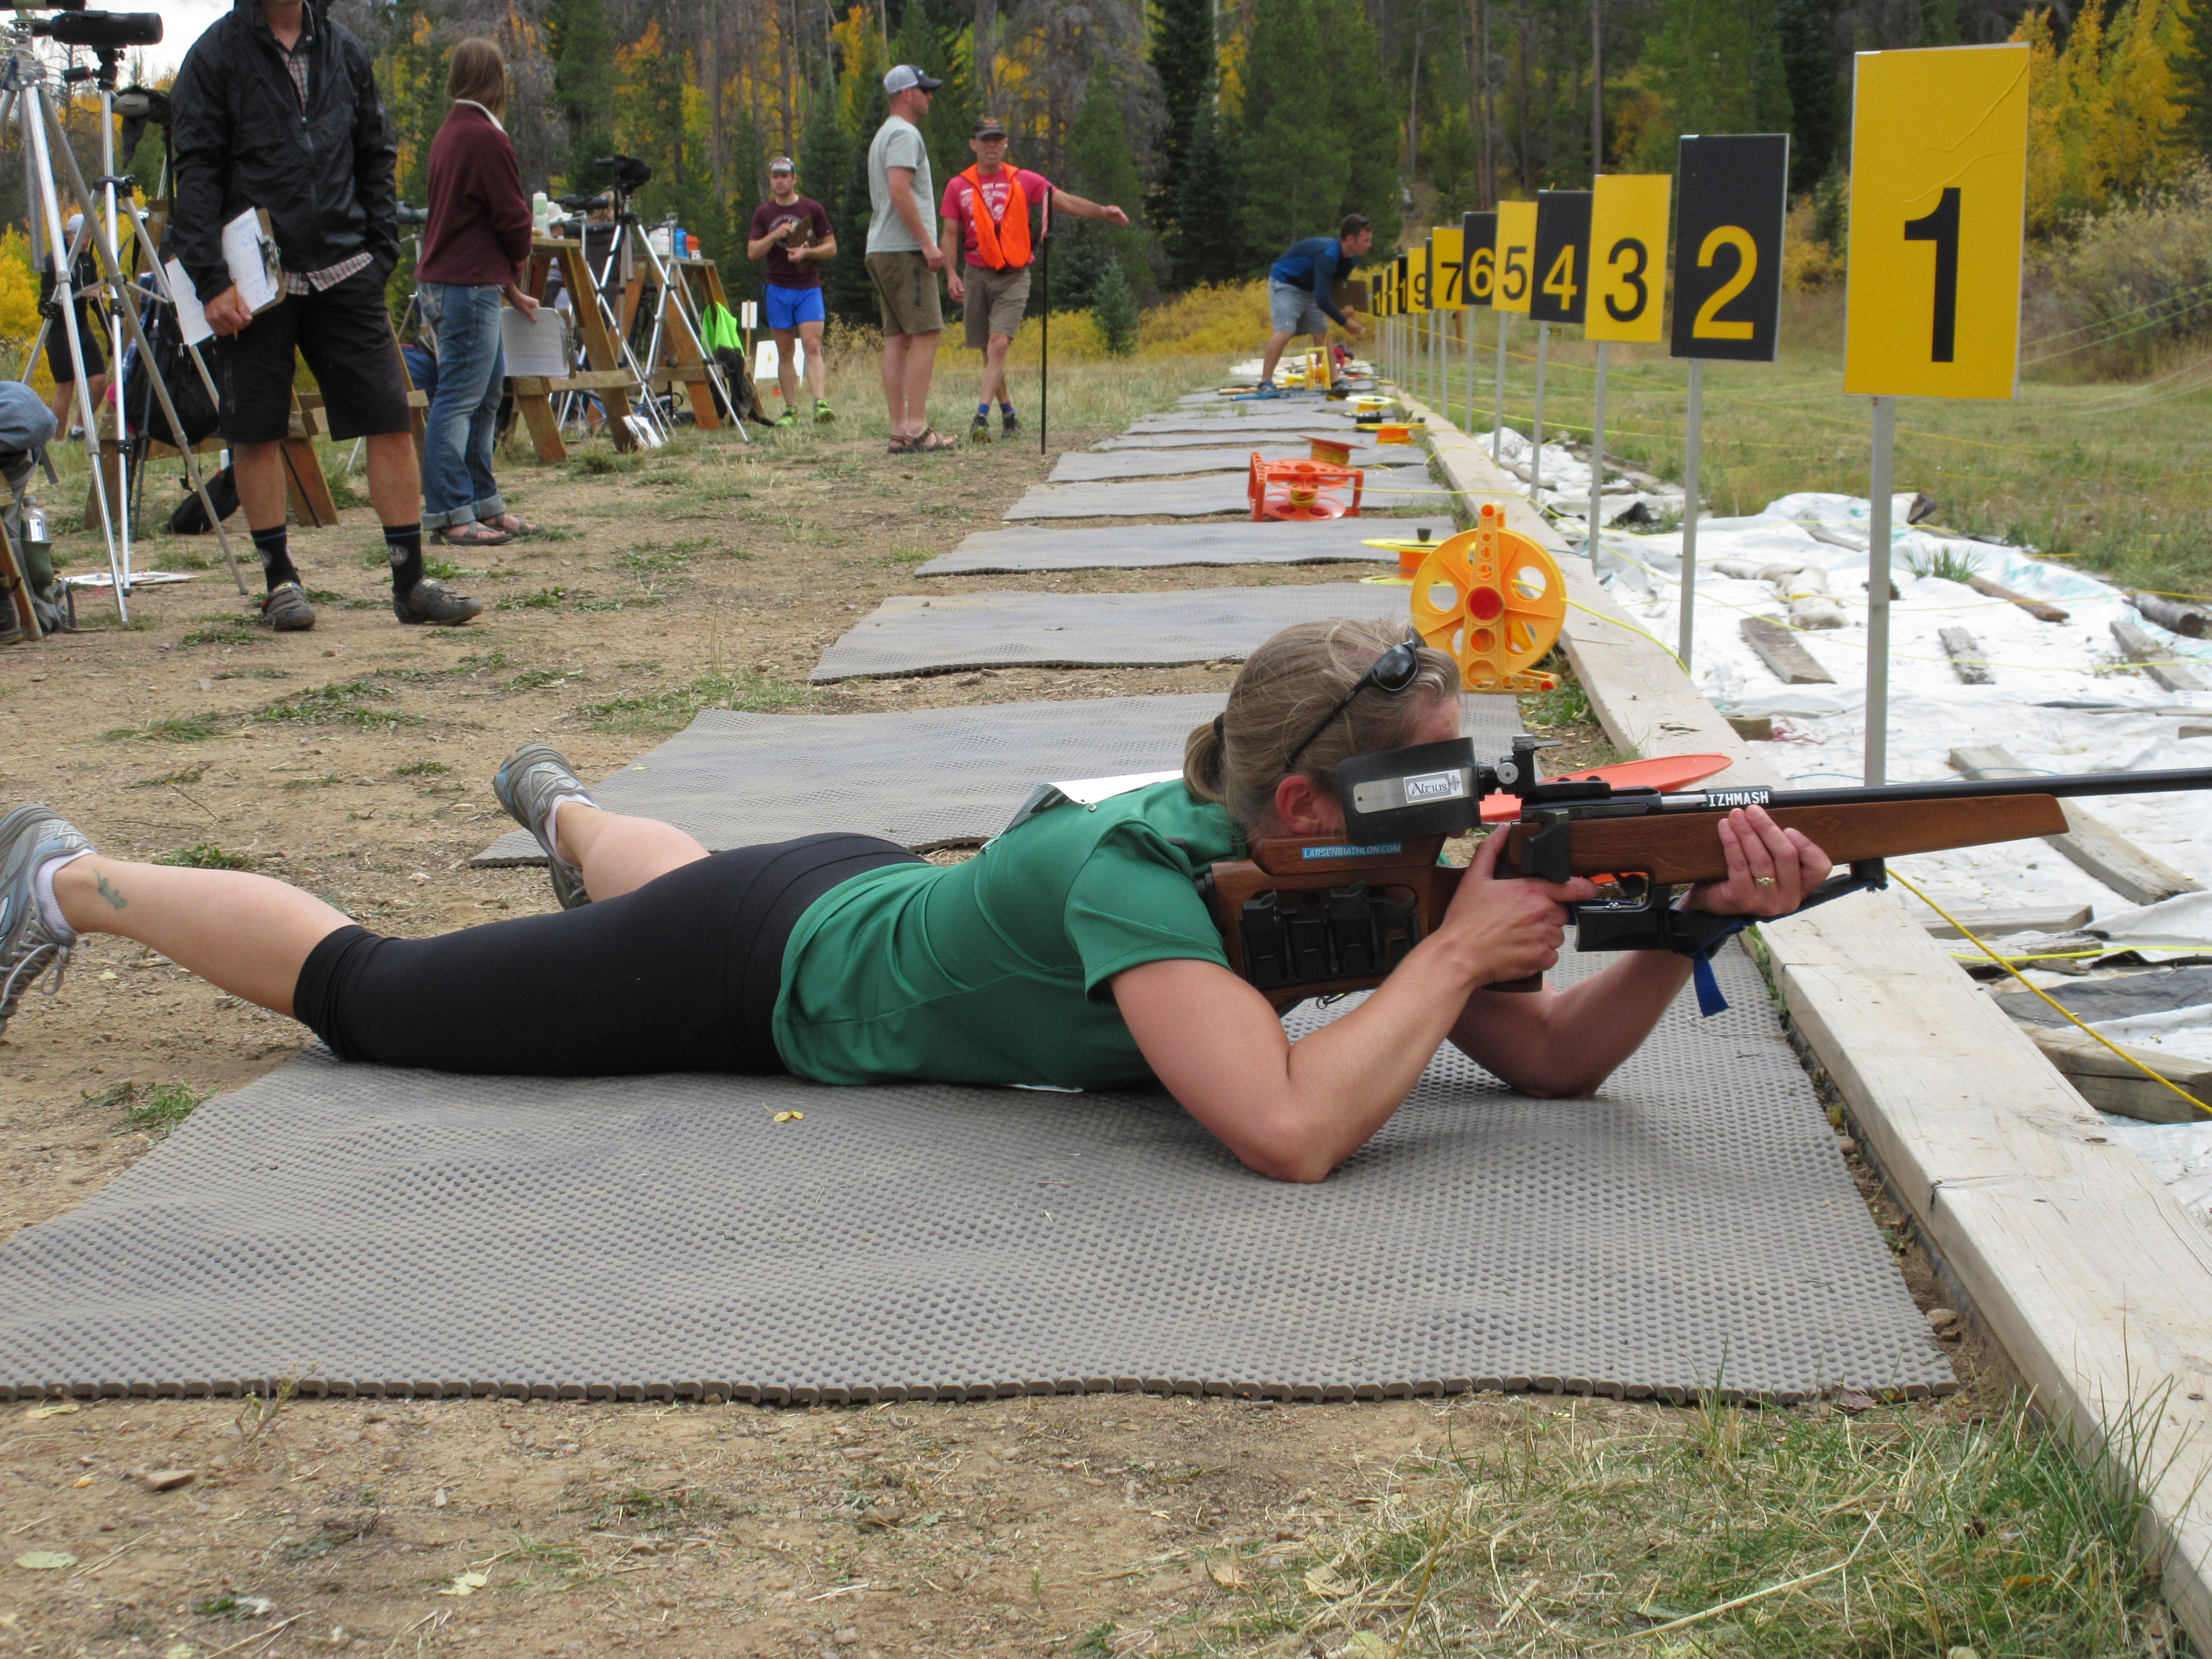
That was not a good thing with a September biathlon race on the schedule. Last winter, Doug and I started this sport and fell in love with it. Our last race was six months ago. In preparation for the upcoming season, we signed up for our local biathlon club’s late-summer event. This warm-weather race would be done by running or cycling rather than by skiing. I absolutely love biathlon and was excited to get out there with my running shoes and rifle. The course was only 5K, so I wasn’t too worried about my lack of training. Certainly I can run a few miles, I figured. It wasn’t like I had been a couch potato all summer. I had done a little bit of running and had still been active with climbing and hiking.
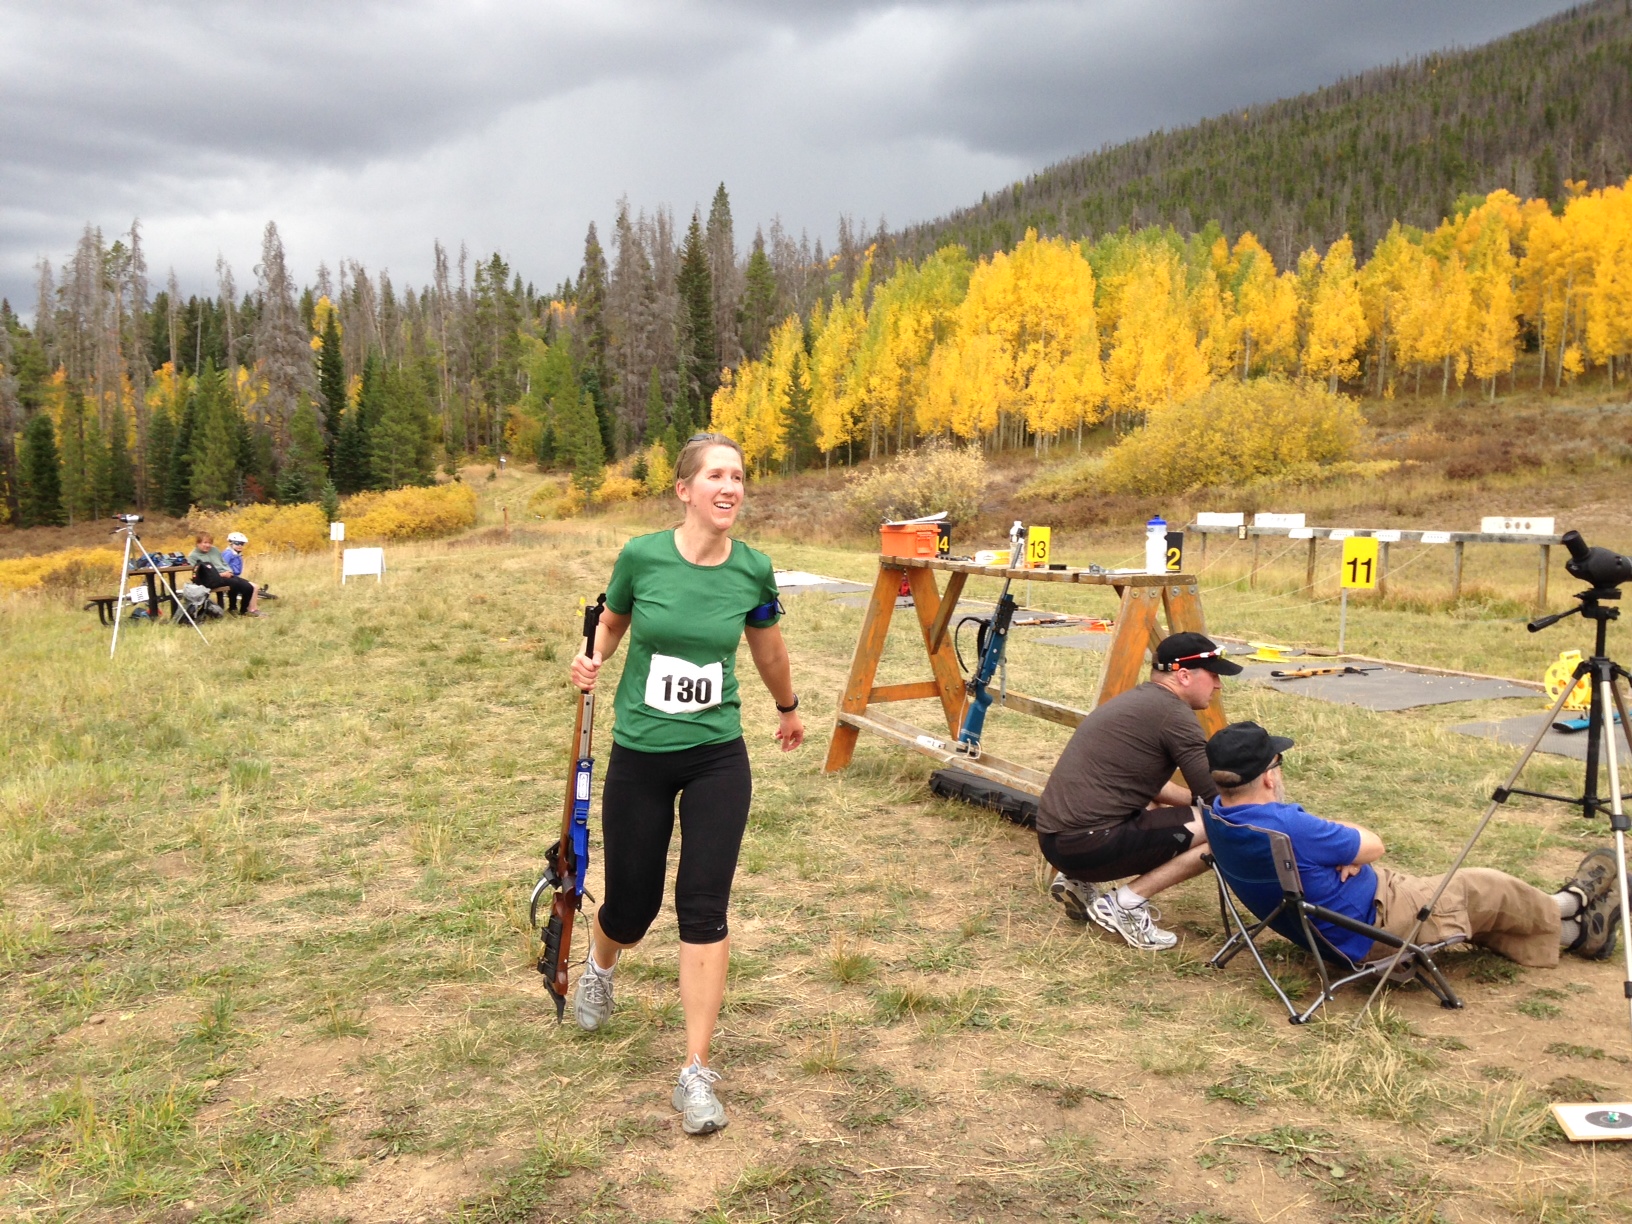
Unfortunately, I was in for a rude awakening on race day. The event was tougher than I anticipated and I huffed and puffed my way through the course. I couldn’t glide down the hills as I was used to doing on skis so it felt like my legs never got a break. Each lap of the race route ended with a small uphill into the range and I was so out of breath during the shooting bouts that I missed most of my targets. That meant a lot of extra penalty laps. Forget about trying to make a certain time–I decided mid-race that my goal would be to simply run the whole course without walking. I succeeded, but was completely wiped out by the time I reached the finish line.
Even though the race was tough, I still had an absolute blast. It rekindled my desire to train for biathlon. Maybe not at a super intense level (I still want to leave time in my schedule to work on art), but enough that I see some personal improvement.
Running into the range for my first shooting bout.
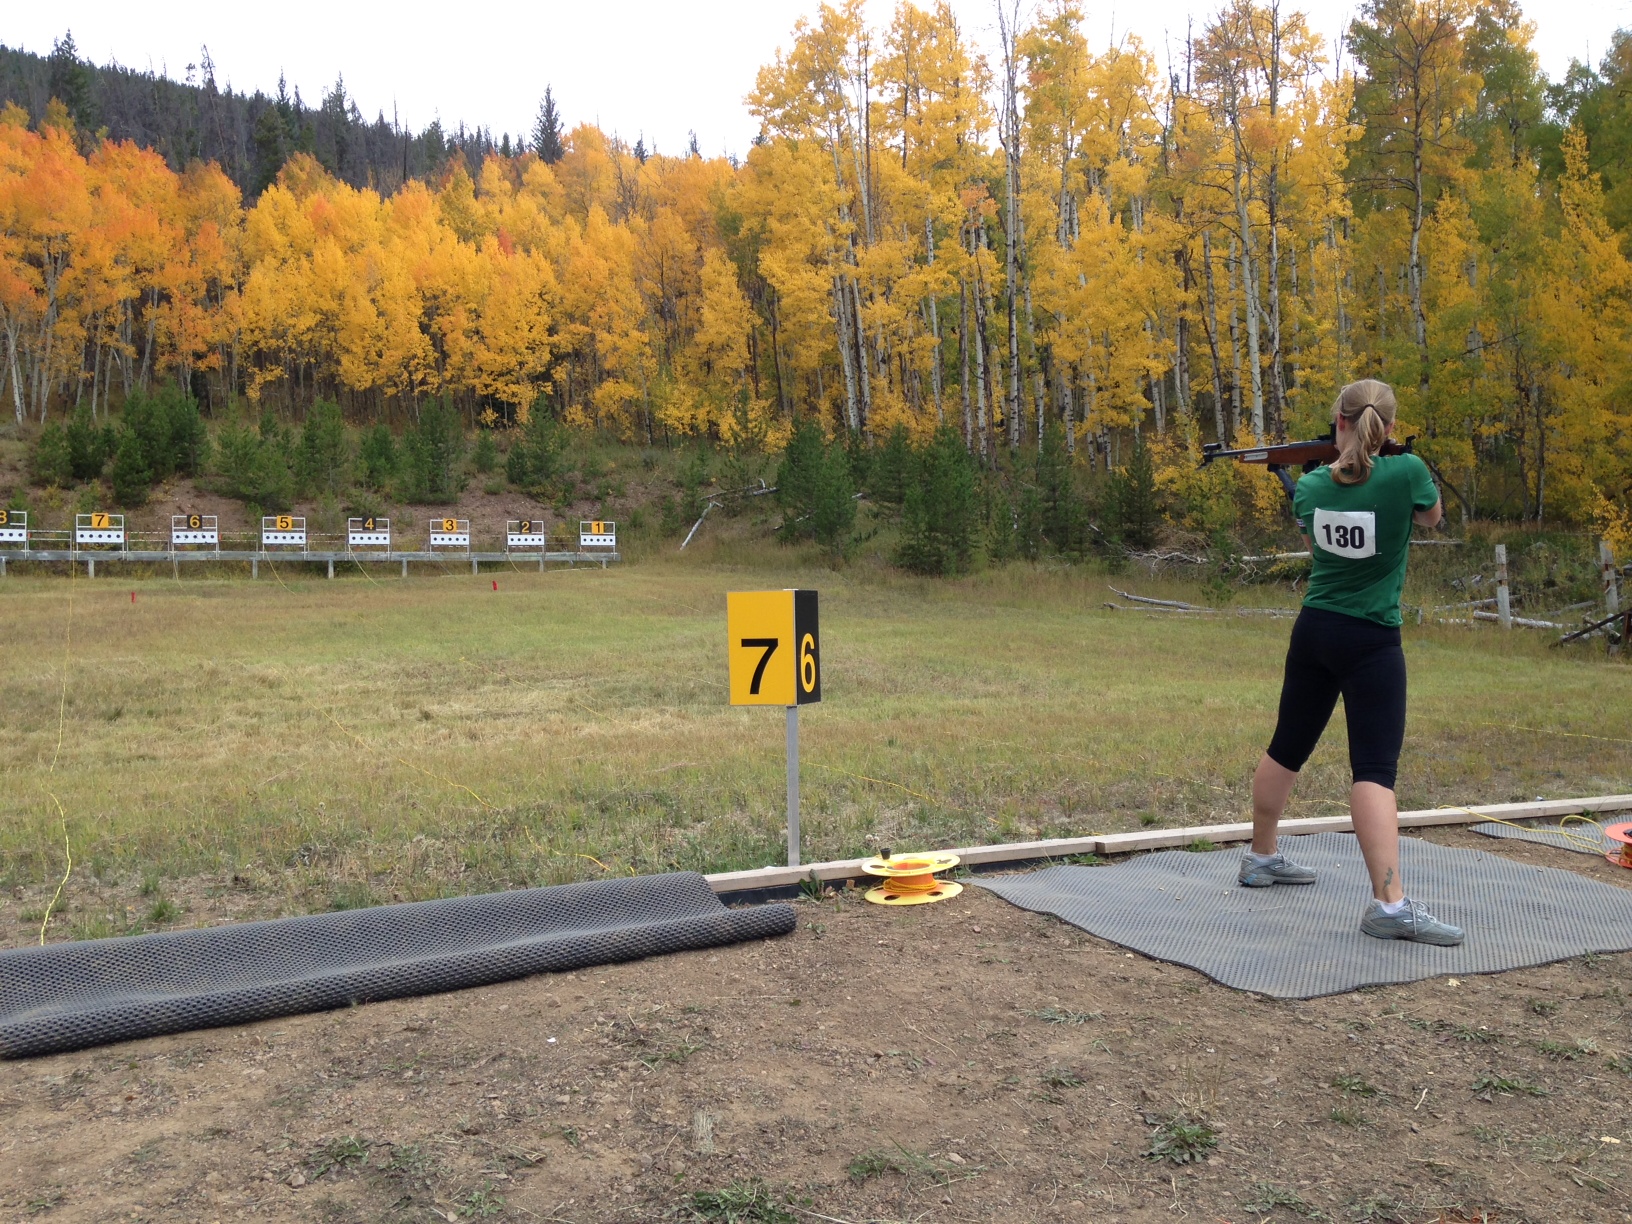
Here I am shooting in prone position. The ability to use both elbows for support makes it a little easier to hit the targets.I couldn’t hit any targets in the standing position. My labored breathing was making my rifle wobble slightly, making a huge difference at a distance of 50 meters.With no targets hit, it is off to the penalty loop for five laps once I put my rifle on the rack. Knowing my fate, I am not sure why I am smiling. Could it be because biathlon is so darn fun?
Another thing that made race day challenging is that I was experiencing watery and profuse ostomy output. I have no idea why—it just happens to me on random occasions. The hard part is that there is no restroom near the biathlon range and the hectic race-day schedule makes it tough to hike back to the lodge to use the facilities. When I am not racing, I am usually helping with scoring or other tasks. My ostomy hadn’t been a problem at other races because I can usually make it six hours between empties. With the higher output, I knew I would have to somehow deal with it out at the range. I thought about taking Imodium, but sometimes that medication makes me feel nauseated, and I didn’t want to feel sick during the race.
To solve the dilemma, I brought closed-end pouches for my two-piece appliance and OstoSolution Seals. When my pouch filled, I dashed off to a secluded spot in the nearby woods to swap it out. The OstoSolutions Ostomy Pouch Disposal Seals made it easy to pack out the full pouches. During the hour I was actually racing, my output slowed down and I didn’t have to worry about it out on the course.
Though it can be frustrating, I really do appreciate it when my stoma acts up and throws me an unexpected challenge. It teaches me to be resourceful and is a good reminder that even on those less-than-ideal days, I refuse to let my ostomy slow me down. Now if only that were the case with my lung and leg power! They are definitely holding me back. In the upcoming months I am going to be busily training for the winter biathlon season so that I won’t get so tired on all those penalty loops.
It’s as harsh out here as on top of peak in a snowstorm. This thought pounded in my head as I cross-country skied down a slope in my second-ever biathlon. The wind was blowing against me so strongly that I had to use my poles to make downward progress. I was freezing in my minimal layers, and I felt eerily alone on the course with no one in sight and snow swirling all around me. The weather was declining rapidly, and I was relieved to be on my final of five laps.
In the distance I could see the biathlon range as I steadily made my way up a final incline. Snow was filling in the trail with drifts, and I felt like I could have walked faster than I was skiing. All that powder would have been much beloved if I were out snowboarding, but I didn’t much appreciate it in a Nordic race. As I got closer to the finish line, I could see the person recording times from a stopwatch. It seemed to take forever for me to reach him. But I finally made it! I finished the race and was super happy that I stuck with it and did not give up. I couldn’t remember doing anything that felt so physically strenuous– not even hiking up Mt. Rainier. Skate skiing is one of the most aerobically intense activities I have ever done.
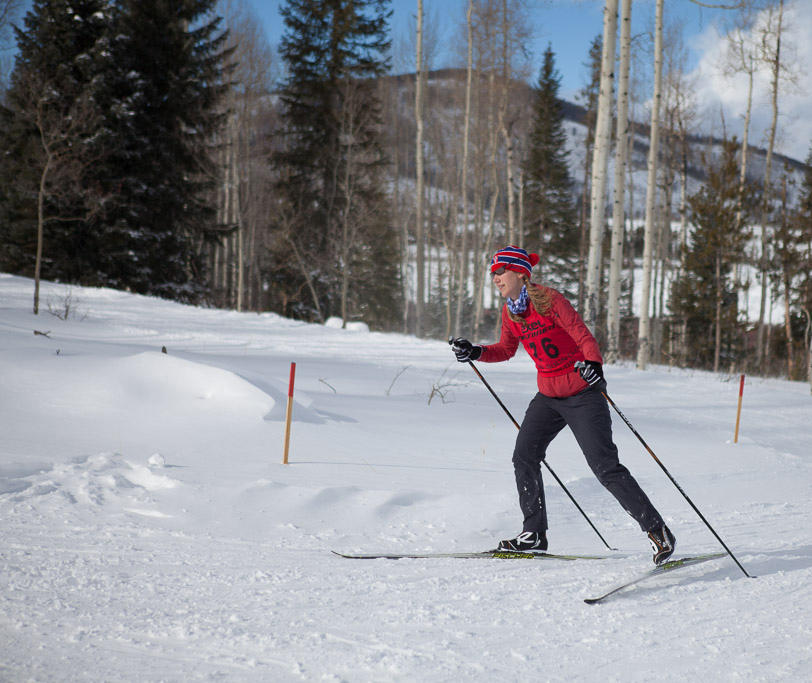
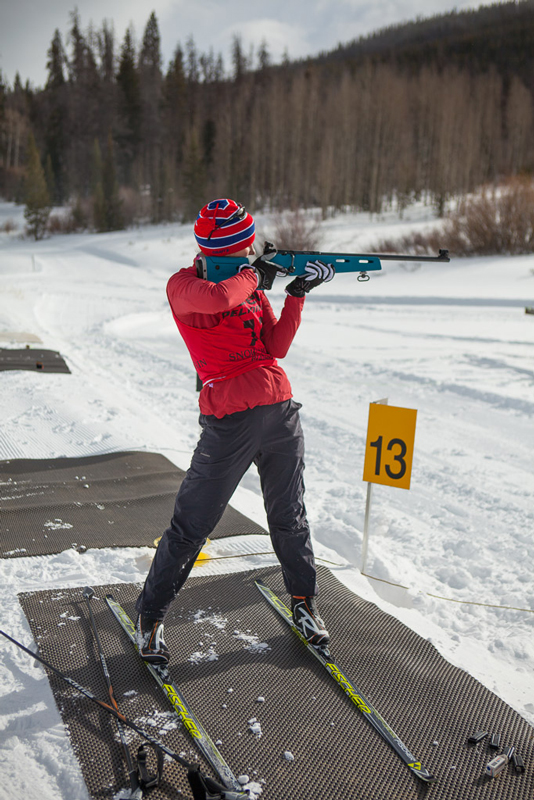
Happily leaving the starting line before the worst of the storm blew in.I could barely stand up in the wind after shooting in the prone position. Miraculously, I actually hit four of five targets at 50 meters away!
We wrapped up the weekend with more fun. After completing the race, we stayed overnight at Snow Mountain Ranch/YMCA of the Rockies (the place where the biathlon was held) and even hit up the climbing wall in the pool. The next morning, we got up early and drove to Copper Mountain to go snowboarding.
A little post-race climbing at the pool.Powder day at Copper Mountain!
When the event results came in a day later, I discovered that I had the slowest pace of anyone who finished any of the various distances. It wasn’t a surprise. This is a new activity for me and I didn’t expect to be good at it right away. I had been working on my shooting a bit, but had put very little attention into becoming better at skate skiing. That changed last weekend when I took a beginner lesson and picked up countless tips that will help me improve. I also plan to begin working on my cardiovascular fitness again by running and going skate skiing as much as I can. I know it is going to take a lot of time and many little steps to get better at the sport.
That reminded me a lot of getting back into the fitness activities and sports I loved after ostomy surgery. Like training for biathlon, it wasn’t a quick process. One of the most common questions I get from blog readers is how long it took me to get back to “X” activity. Since a lot of information on that subject is buried in other posts, I thought I would create a summary of how long it took me to return to activities and what some of the challenges were. Keep in mind that I did have some significant complications with my abdominal incision healing due to a rare reaction to my particular suture material. This extended my healing time.
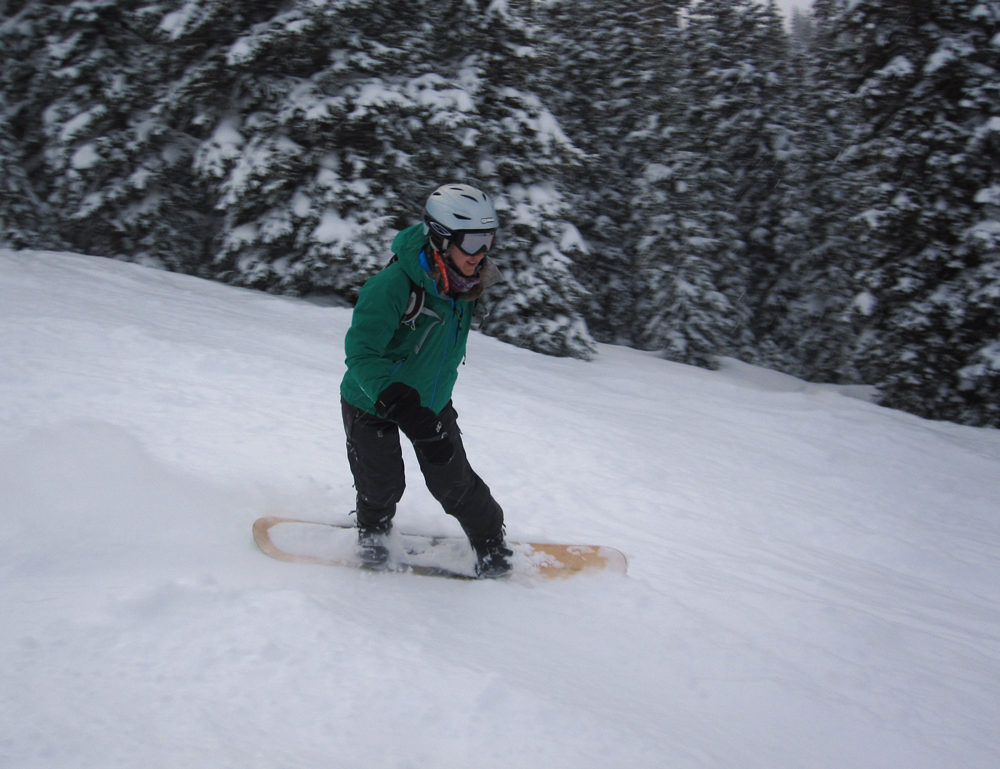
Snowboarding: I did this activity for the first time at around five months post-op, but because it was the end of the season, I was only able to get a few days in. I was surprised at how effortlessly the movement of boarding came back to me after losing so much strength after surgery. The most difficult part was getting back into a standing position after taking a tumble. Due to the crunch-like movement involved, it felt hard on my core. I wore (and still wear) a six-inch wide hernia prevention belt to help support my abdominal muscles. At first I was also careful to not venture onto icy terrain since falling onto my butt hurt the area where my anus had been removed. By the next season (about a year post-op), all that pain was gone and I was able to return to my pre-surgery level of boarding.
Getting on my feet during my first post-surgery snowboarding trip was tough on the abs!
Hiking and backpacking: I went on my first backpacking trip at around five months post-op as well. I checked with my surgeon to make sure carrying 25 pounds was okay and then headed into the backcountry at the first opportunity–which happened to be a very cold and snowy April weekend! Once again, I wore a six-inch wide hernia prevention belt and was mindful to keep the weight in my pack light. Doug carried many of my things and helped lift the pack onto my back. Once it was centered on my legs, it didn’t strain my abdominal muscles at all. The cold made this first trip with my ostomy difficult, but I was happy with the extra challenge. I knew if I made it through that, warm weather adventures would be easy.
After this trip, I kept hiking every weekend and slowly upped the distances traveled and amount of weight carried. I went on a few more overnight trips and began hiking 14,000-foot peaks. I remember walking like a turtle on the first one, but I just kept at it. By ten months post-op, I was able to go on an eight-night backpacking trip carrying 52 pounds. Through all these adventures, I was continuously experimenting with supplies and techniques for dealing with my ostomy outdoors and I tried to put myself in challenging situations to maximize my learning and face my fears. For instance, I could easily have changed an appliance before a wilderness trip, but instead I would purposely wait to do it in my tent in the backcountry just so I could get the practice and become confident with my ostomy in those situation.
A little snow couldn’t keep me out of the backcountry once my surgeon gave me the go-ahead to carry a pack again at 5 months post-op.
Running: I waited seven months after surgery to go running and I progressed really slowly. For whatever reason, this activity made me much more fatigued than hiking or backpacking. I also had pains in various areas of my abdominal wall (almost like a stitch or side-ache in the muscles surrounding my stoma) for almost a year after surgery. I never knew exactly what caused this, but it always felt okay again a day or two after running so I chalked it up to muscle fatigue. After all, I had been cut open from belly button to pubic bone. That is bound to affect the abdominal wall a bit! Eventually those muscle aches went away and now I am able to go on long runs with no discomfort. I also wear a six-inch wide hernia prevention during this activity to help support my abdominal wall.
Jumping for joy on my first trail run which happened a little over a year post-op.
Rock climbing: This is the activity I took the longest to return to. Climbing involves many twisting and stretching movements and a lot of physical exertion. My surgeon never said I had to wait a year to go, but that is what I decided to do in order to give myself plenty of time to heal. I knew my ostomy was permanent and I wanted to do everything in my power to reduce the possibility of a long-term injury like a parastomal or incisional hernia. I was willing to wait as long as it took for my body to tell me I was ready. In the meantime, I worked on hiking and backpacking so it never felt like I was sitting around waiting to climb. To get stronger while I was waiting, I worked with my physical therapist to strengthen my core with gentle and safe exercises. By eleven-months post-op, I finally felt that I was strong enough to rock climb. I started in the gym by ascending routes that were easy and low-angle. Then I started to do the same outside. Over the following year, I slowly bumped up the difficulty of routes I was attempting and ventured onto more vertical terrain. At 22 months post-op, I led my first easy sport route. Now that I am over three years out from surgery, I am climbing in the gym on a weekly basis, doing overhanging routes and am back to scaling rock walls at my pre-surgery level. The only thing that I have yet to do is return to leading traditional routes where I place my own gear. Just like with every other strenuous activity, I always wear a six-inch hernia prevention belt.
Leading a climb at Shelf Road in Colorado this fall. I was back to leading sport climbing routes 22 months after surgery.
Yoga: Like rock climbing, I waited a year to do yoga. I know I could have gone earlier, but I was busy working on the core exercises with my physical therapist and decided to wait to try yoga until my incision area felt solid. Interestingly, I found corpse pose to be one of my most uncomfortable poses. Lying on my back made my incision area ache like crazy. I think this was the result of horrible posture during the first four months after surgery when my incision was extremely painful. During that time, I was protective of the area, and I found myself walking in a hunched-over position. It took a while to reverse that and make my muscles to feel okay with being lengthened again. Nowadays, corpse pose feels fine and the only thing I still have trouble with are bridge positions. My body tells me to go easy on those and so I do! I wear a hernia belt while doing yoga too, but switch to a four-inch model as it is easier to bend with that width.
Bicycling: This sport was gentle on my body and would have been perfect after surgery save for one thing: my butt hurt from having my rectum and anus removed. And this pain was not quick to go away. It took almost a year for the deep muscles in that area to feel like normal again. Fortunately, once I hit six months-post op, my pain had at least diminished enough that I could sit on the seat without too much discomfort. Now I can spend hours on the saddle with no issues.
I took my first bike ride six months post-op when Doug and I pedaled a short distance to see a baseball game. It did hurt my healing butt, but was tolerable.
As I get into my new sport of biathlon, I realize that it is going to take a lot of hard work and patience to get better. I know someday when I am skiing a bit more efficiently and faster, those early times when I struggled up the hills or felt like taking a nap in the snowdrift will seem like a distant memory. It was that way with my ostomy. Getting back to my pre-surgery activity level took perseverance. My progress sometimes seemed dauntingly slow. However, as I moved towards that goal, I celebrated each small victory. Before I knew it I was back on my favorite slopes, trails and rock faces and my life was richer for all the tiny but amazing steps that got me there.
“It is good to have an end to journey toward; but it is the journey that matters, in the end.”
-Ernest Hemingway
Me and my wound vac returning from our first trail hike after surgery. This was four months after my operation and I traveled a whopping 1/8 mile. After having major incision healing complications, this was a huge milestone for me and I went home and celebrated with my first post-op beer.
Doug and I kicked off the new year by taking part in our very first biathlon race. I decided before the event that I wouldn’t worry about my time or how many targets I hit and just enjoy immersing myself in a new activity. After all, I barely even knew what a biathlon involved three months ago and here I was wearing a race bib and sliding on skis that I waxed myself! What a fun and unexpected way start to 2014!
As for the results of the race–I ended up taking a while to complete the 7.5 kilometers, didn’t shoot that well and skied A LOT of penalty laps (extra skiing due to missing targets). However, today my father-in-law sent some photos that he took of the race and I noticed something: I have a huge smile in just about every photo. Clearly I wasn’t that concerned about my easy pace or any lofty goals; I was simply loving my time on the course.
When I was pondering setting updated goals for 2014, I thought about the biathlon and how I seemed to savor the experience more by not putting so much pressure on myself. Maybe for this next jaunt around the sun it is okay to ease up by not having a huge list of things I want to achieve. I have a general idea of what I hope to accomplish in the next year, but mostly I’d just like to allow some time for a little spontaneity, smile as much as I can and enjoy the journey.
Magazines? Bolts? Barrels? No… I wasn’t reading, building something or making wine. I was sitting in class learning all the terminology to shoot a .22 rifle in a biathlon race. Doug and I decided to give a new sport a try this winter and biathlon looked like a lot of fun. This weekend there was a clinic to learn about rifle safety and how biathlon races work.
I cross-country skied years ago, but it had been at least ten years since I had been on skinny skis. The shooting part was new to me, save for a couple of lucky shots (I hit the target!) with a BB gun in Wyoming. I was a little nervous to try both of these things together, but I am glad I did. I had a great time! There were many newcomers to the sport in the class and it ended up not being intimidating after all. I even managed to hit a few targets during the practical portion of the class. Of course–it will be much more difficult to do that while skiing in an actual race. One of the biggest challenges of biathlon is attempting to hit targets when your heart is pumping fast and you are breathing hard. There is a race in January that I am thinking of doing so I can get a feel for what this really feels like.
Getting a feel for my skinny skis.Doug taking aim at the biathlon range. The distance is 50 meters.I earned my “red book” during the course. This shows that I am now certified to take part in biathlon races or practice on the range.
At the clinic, I was focusing on keeping my hands warm (the high temperature was a whopping 13 degrees), remembering how to skate ski and figuring out a lot of new vocabulary and skills. I was also hoping that skate skiing wouldn’t irritate the avascular necrosis (AVN) in my left shoulder joint (which fortunately it did not). One thing that I wasn’t thinking about at all was my ostomy. My altered plumbing feels very normal to me now and it rarely enters my mind except when I go to empty my pouch.
That wasn’t the case three years ago. At this time back then, I was a month out of surgery and struggling emotionally. It felt like my ostomy was the only thing I thought about during an entire day. Changes were overwhelming, I was full of anxiety and I wondered if life would ever feel normal again. Even though I had wanted my ostomy for treatment of my UC, I grieved over the changes to my body and cried every single day.
Those times were tough, but I know that I had to go through them to get to where I am now. Returning to an adventurous life after my ostomy didn’t happen all at once; it took a lot of small steps. Had you told me back then that I would be shooting a rifle at a biathlon course in a few years, I would have thought it was crazy! As I enter my fourth year with an ostomy, it is great that life feels so normal again and it is also wonderful to be trying a new sport challenge. I can’t wait to see where my skinny skis take me!
I must admit it. I have been very fortunate when it comes to my ostomy. I have had the best medical team imaginable through my UC and surgery journey. I have a wonderfully constructed stoma that functions perfectly and my wafers never come loose or leak. As of yet, I haven’t had the troubles with foods or blockages that some people with ostomies do. I don’t take any of this for granted and try to live each day with a sense of gratitude over the way things have turned out and for my restored health.
I felt this same level of thankfulness many times on my Rainier climb. I would stop for a few moments, look around in amazement and think I can’t believe I am really here and then close my eyes and give a silent thanks. Leaving the park after the climb was really hard. I didn’t want to let go of all I had experienced on the mountain. As we drove away, I kept wanting to take one last glance at the peak–as if each additional view would somehow help me better process all that being up there had meant or would make the memories more lasting. My ascent of Rainier couldn’t have turned out more perfectly, and it felt as if the stars had aligned for so many aspects of the trip:
My climbing team was amazing
I climbed with the best group of people that anyone could ask for. We had a total of four guides and eight participants in our team. Just by sheer luck of schedules– two of our guides also happened to be doctors and three of the other clients were nurses. Though I didn’t talk about my ostomy a lot on the climb (I had other things to focus on), having teammates with medical knowledge made bringing it up infinitely easier.
Our group met at the guide service headquarters the day before our climb to go over gear and logistics. After the meeting, I stayed back to talk with Emily Johnston, our lead guide, and also an ER doc. I brought up some of the unique challenges my ostomy presented (hydration, having to empty on rest breaks, etc.). She had some experience with patients who had ostomies and was very understanding and matter-of-fact about it. From that point on, I knew there would be no awkwardness when I had an ostomy-related question or needed to deal with it on a rest break.
Our team.
All four of our guides were amazing and top-notch. One of our guides, Craig John, had made it to the top of Everest. Liam O’Sullivan, another guide and doctor, had set a speed ascent record on Rainier in 2008. Emily, Liam and Craig had also climbed Rainier over 100 times. Our final guide, Jeff Ward, was certified with both the International Federation of Mountain Guides Associations as well as the American Mountain Guides Association and instructed other alpine guides. Suffice it to say that we were in very good hands.
The other climb participants were some of the nicest people I have met. We formed a quick bond and everyone was so encouraging and supportive of each other. I truly hope that someday we will get to meet up in the mountains and climb together again.
Taking a few minutes to rest before roping up and heading to high camp.
The weather cooperated
Day one was sunny and clear blue, but when we woke up on day two, an angry looking lenticular cloud had situated itself over the top of Rainier. Fortunately, we were only practicing glacier travel skills and rope work near our low camp at Camp Muir that morning. After a short hike to the high camp at the Ingraham Flats in the afternoon and an early dinner, a ferocious thunderstorm blew in. Not only were we surrounded by intense lightning–which was fortunately attracted to the higher ridges and not our camp–but three to four inches of fresh graupel (soft hail-like snow pellets that resemble the innards of a bean bag) fell. The forecast didn’t look good for our summit attempt the next morning either, and we went to bed feeling disappointed that we probably weren’t going to make it any higher on the mountain.
Making our way to high camp a couple of hours before the severe storm blows in. The crevasses were scary but beautiful.My father-in-law Peter checks out the spectacular post-storm clouds.Home sweet home at our high camp at the “Flats” on the Ingraham Glacier.
Much to our happy surprise, we woke up to our guides’ voices telling us that the skies had cleared! We quickly ate breakfast (at 11:30 p.m.–yes, that’s right, in the middle of the night), got packed up and then tied in with our assigned rope teams. It was slow going with all the fresh deep graupel on the trail which made it feel like we were walking in deep sand. I was second in line, and for every step forward, I slid a half a step back.
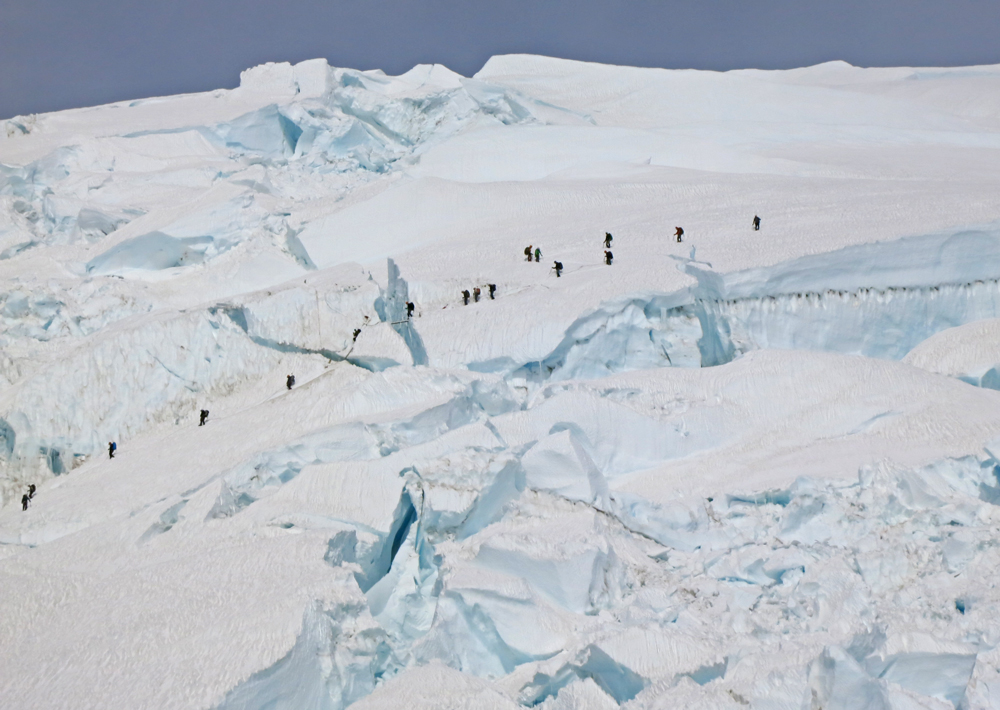
The route was also more technical than it usually was at this time of year. Several larger crevasses had opened up, and we had to cross the gaping abysses by walking across extension ladders secured on each end. When I shined my headlamp into one of the voids I could not see the bottom. As we hiked, we could see that the stars were disappearing in the dark sky– more clouds were coming in. We pushed on and reached the top of Rainier at 7:30 a.m. We were only able to bask in our success for maybe ten minutes before it was time to head down. The clouds were looking alarmingly like the ones that had just dumped on us the previous evening. Even in good weather, the technical crevasse sections of the route had a tendency to cause a bottleneck of climbers. Being stuck waiting in an exposed place surrounded by lightning would have been terrifying and dangerous. Though we all would have loved to spend more time on top, we knew it was not worth the risk. As it turned out, the clouds blew over without incident and we ended up having great conditions for our descent.
Peter, Doug and I on the top of Rainier! They can’t be seen in the photo, but some ominous storm clouds were gathering to the south. Fortunately they never materialized into much and we had good conditions on the descent.Descending the upper slopes of the mountain.Another team makes its way down the route. A climber crossing a ladder over a large crevasse can be seen in the center of the photo.Doug makes his way across a ladder that bridges a gaping crevasse.
My ostomy behaved
Two days before I was to leave for my climb, my ostomy acted up for no apparent reason. I had pure liquid output for a while and when I changed my appliance wafer one final time before leaving, I noticed I had numerous ulcers on the surface of my stoma. I had experienced these on many occasions before and even had them biopsied (which only showed non-specific inflammation and not Crohn’s). However, this time there were more ulcers than usual and some of them looked different. Along with he circular ones that I have been getting on the side of my stoma, there were strange elongated amoeba-shaped ulcers on the tip and just barely extending into the inside of my stoma. I thought, Oh no! I don’t need something new to deal with right before heading out on the climb.
I decided not to worry about it. If I had liquid output and had to change my closed end pouches more frequently along the route, so be it. I had also trained with a much heavier pack than I would actually be carrying on the trip. I knew that if I had to bring more water to offset any extra fluid loss, I would be fine with the pack weight.
Luckily, the morning we left the trailhead, my output thickened and my ostomy fell into its usual pattern of having to be emptied every four to six hours. The first day of the climb I was even able to go one stretch of eight hours. When I returned to my lodging after the climb and put on a new wafer, I noticed the ulcers had also started to go away. Whew!
I ran into one of my IBD role models on a rest break
Years ago, Doug did some website work for International Mountain Guides and met with the three guys that ran the company: Eric Simonson, Phil Ershler and George Dunn. When it came time to climb Rainier, we knew we wanted to make the trip with their guide service.
In 2006, when I was first diagnosed with ulcerative colitis, I also found out that Phil Ershler had Crohn’s disease and had recovered from colon cancer. He and his wife Sue had just shared their story in the book Together on Top of the World which chronicled their journey to overcome those challenges and climb the seven summits together. I read the book and went to see them speak at a local climbing shop and was deeply moved. The things that Phil had gone on to do in spite of IBD were truly remarkable. As my disease continued to worsen over the years, Phil’s story remained an inspiration to me.
When we knew we wanted to do our climb with International Mountain Guides, I emailed Phil and asked him his thoughts on doing the climb and what route might work best for me. He gave me some great suggestions and was really encouraging. As luck would have it, we ran into Phil on the way to Camp Muir on day one of our trip. He was descending from a day hike with his wife and a friend and happened to pass by just as we had paused for a rest break. He stopped to chat with our group, and I pulled him aside afterwards to thank him in person for the encouragement and inspiration. I still can’t believe that of all the days on the mountain… and all the people who climb it… and of all the places to take a rest break… we ran into Phil right there that day. Seriously. What are the chances?!
Chatting with Phil Ershler, co-owner of International Mountain Guides, at a rest break.
Though there were many fortuitous things on my climb, there were also aspects that were not just a matter of luck:
I trained really hard
The months before my climb were a roller coaster ride of injury and uncertainty. From being diagnosed with steroid-induced avascular necrosis in my shoulder in December to having hip and Achilles tendon problems in the spring– I really thought I might never be able to do the climb. However, I did everything I could to make it happen. I worked diligently with my physical therapist to get to a point where I could at least hike and aqua-run again and then did those activities week after week. If I was tired after work, I still found the motivation necessary to head to the pool. When the alarm went off at 1 a.m. every weekend to hike a big peak, I rolled out of bed and did it. Once on Rainier, this training made the climb so much easier. I still can’t believe how healthy and strong I felt up there; it was everything I had hoped for.
I was willing to ask tough questions
When I filled out my application for the climb last fall, I was very open about my ostomy. I wrote about the challenges it presented and asked for feedback from the staff about how I could handle these things on the climb. No– it wasn’t easy writing to strangers and explaining ostomy waste and my various needs related to it. However, because I was straightforward and honest about my situation, I got some amazingly helpful suggestions and gained insight into how I could adapt to the conditions I would likely encounter on the trip. Once I got up there, I was able to enjoy the climb and not worry about my ostomy because I knew what to expect.
I did not give in to fears
There were a plethora of things to be nervous about in regards to my ostomy on Rainier. Would I be able to stay hydrated on long days when all our water came from snow and could only be obtained at camp? Would it be really hard to swap full pouches on steep slopes in the cold? What about when being roped up on a team? Would my heavy pack be a problem? How much should I tell my fellow team members about my ostomy and when? I knew rest breaks were kept short. Would I have enough time to empty my appliance plus refuel and hydrate?
Instead of getting too worried about any of these things or letting them stop me from going, I equipped myself with as much information as possible to help me prepare for the trip. Beyond that, I wholeheartedly jumped into the unknown and let it play out minute by minute. There were many times that I had no idea where I would swap out a pouch within the next hour or when a conversation with another person might turn to my ostomy. I figured it out as I went along and that is one of the things that made it such a grand adventure.
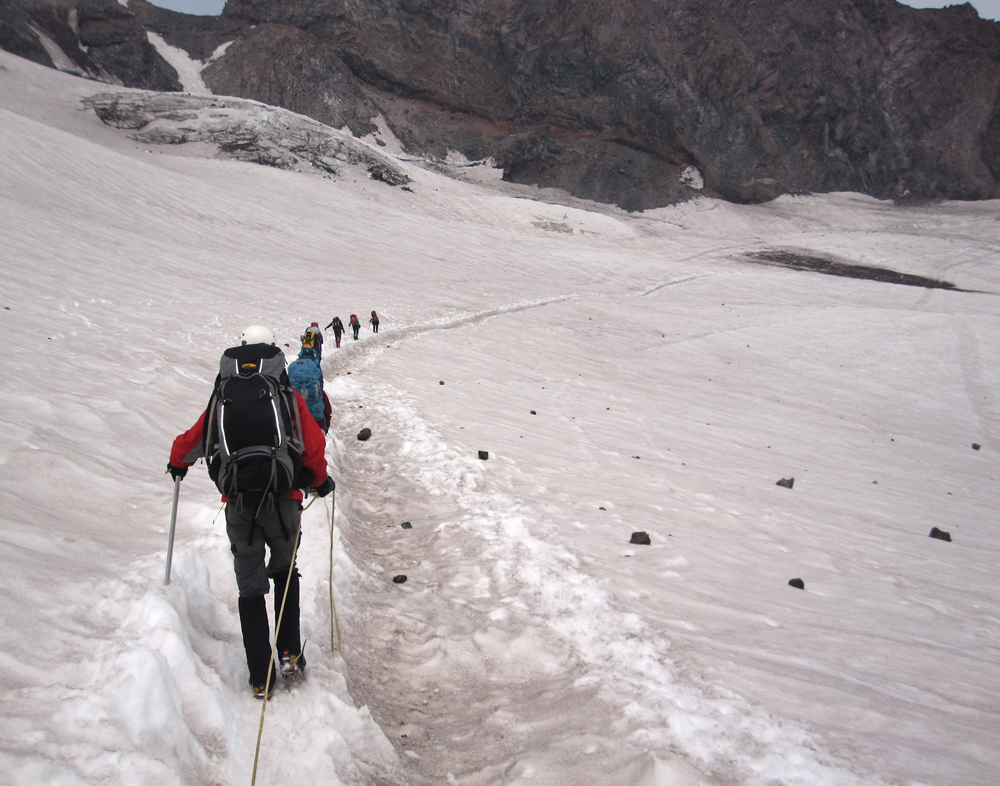
As we crossed the Cowlitz Glacier on the way to high camp, we had to move quickly through an area prone to rockfall.
The video in this post covers some highlights of the trip and conveys the emotions of the climb better than I could ever express in writing. Due to the fast pace of the climb and the fact that we were moving through difficult terrain in roped teams, carrying ice axes and wearing heavy gloves, we weren’t able to record nearly as much footage as we usually do for our films. I plan to do two more written posts in the upcoming weeks covering more details about the Rainier trip: one on the specifics of how I managed my ostomy on the climb and another regarding the sometimes challenging issue of knowing how much information to share with others regarding one’s ostomy.
When life gets busy, some things end up on the back burner. Lately, that item has been sleep. There has barely been a night in the past couple of months when I have gotten more than seven hours of shuteye—usually the number has been closer to five and there have been times it has been less.
What has forced sleep onto the back burner? In part, it’s a large, glaciated peak named Mt. Rainier that I will be climbing very soon. Along with my full-time job, life lately has consisted of these four things: hiking peaks every weekend to prepare for Rainier, going to the gym in the evenings to train for Rainier, keeping up with my physical therapy so that my joint issues don’t crop up on Rainier, prepping and packing for the Rainier climb. See a theme here? All these things take up an incredible amount of time. Many evenings I don’t get to bed until late trying to squeeze it all in. Most every training peak we have done has required a wake-up time of 1 a.m. in order to make it to trailheads early so that we can summit peaks before afternoon storms roll in. And even then—we experienced static electricity and buzzing hiking poles on one peak as a rogue storm cloud blew in at 9:30 a.m. Yikes!
With the climb on the front burner and sleep on the back one, my blog has worked its way into the far rear corner of a little-used cupboard behind a large kettle. Tonight I clanked through the pots and pans and dug it out for a quick post. To everyone who has been tuning in to the blog or who have emailed or commented and not gotten an answer: thanks for your patience. I will be back to posting and corresponding regularly once I return from the trip. Below, I am including some photos of our adventures so you can see what I have been up to. Since my last post about five weeks ago, we have climbed six 14ers and four 13ers, including a three-day backpack trip with one of the adventures. Whew!
As I prepare for Rainier, I am starting to get a little nervous about some ostomy-related things. I am wondering what it will be like trying to discreetly swap out closed-end pouches while roped up on a team, including some strangers. I hope I can keep up with my hydration needs. I am afraid that during short breaks, all my time will be used dealing with my ostomy and that I won’t have time to eat and refuel. Will my ostomy supplies make my pack heavier than everyone else’s? I know it will all be fine, but there are a lot of unknowns on the trip.
One thing that has really helped me not worry are the amazing staff at the guide service we will be using, International Mountain Guides. I have explained what having an ostomy is like to them and have asked for their suggestions on everything from dealing with poop on the mountain, to questions about hydration and accommodating my gluten-free diet. It is always a little awkward bringing up the intimate details of life with an ostomy, but being open about it helps me get the answers I need. The staff has made the process so easy. I feel comfortable asking them anything which definitely helps quell the fears.
In many ways though, I love the uncertainty. The best thing I have discovered for becoming confident with my ostomy is to throw myself into new situations wholeheartedly. Through those occurrences, I learn that I can be resourceful and adapt to anything. I can’t wait to see what challenging experiences await me on the gorgeous ice-covered slopes of Mt. Rainier. No doubt I will come back from this adventure with my horizons stretched even farther.
On the summit of 14,060 ft. Mt. Bierstadt at 9:30 a.m. in what we thought was just a rogue, misty cloud rolling through. Moments after this photo was taken, Doug’s hair started to stand on end and our poles began to buzz. We never ran so fast down a mountain.Breathtaking views often come with early starts. The moon sets over the saddle between 14,270 ft. Grays Peak and 14,267 ft. Torreys Peak.Taking a breather and soaking in the view after hoofing it up a steep gully on our ascent of 14,264 ft. Mt. Evans with a 45-pound pack. We make our packs heavy for training by carrying bags full of water. I actually threw in a few rocks for extra weight before heading up this slope:) I definitely won’t be doing that on Rainier!Resting with my 55 lb. pack on a three-day backpacking trip to climb 14,005 ft. Mount of the Holy Cross. After a night of sleep at base camp we ascended the ridge on the right side of the photo.Spectacular early morning sunlight greets us mid-route after starting our hike up Mount of the Holy Cross at 3 a.m.On the summit of 14,005 ft. Mount of the Holy Cross.Descending from 13, 237 ft. Notch Mountain the day after ascending Mount of the Holy Cross–obvious in the background.Ascending Mt. Yale with my monster pack in some early morning fog.There were no views from the summit of 14, 196 ft. Mt. Yale on this day.Yet another 3 a.m. alpine start as we leave for the 13er called Turner Peak, the day after hiking Mt. Yale.On the summit of 13,233 ft. Turner Peak. The day before we climbed Mt. Yale which is the peak in the center behind the mist cloud.For our final training hike, we did a chain of peaks: 12,454 ft. Mt. Chapin, 13,069 ft. Mt. Chiquita and 13,514 ft. Ypsilon Mountain in Rocky Mountain National Park. Just for fun, we reascended Chiquita on the way back to throw in a little extra elevation gain.On the summit of 13,514 ft. Ypsilon Mountain. The next time we will be at this elevation will be on Mt. Rainier.
Lately I have become part octopus, part mountain goat and part fish.
The octopus part of me has been juggling tasks at work like crazy. I spent the last couple of months organizing a big festival while also having a bunch of other programs to design and lead. One weekend I was teaching a nature-sketching workshop, the next a toddler class on toads. When I am done typing this post I need to practice my guitar for an upcoming campfire program. I have longed to come home and do something relaxing after this whirlwind, but that is not in the cards this summer. What is on the agenda is Rainier and I need to use every spare minute getting my body ready for the climb.
This leads me to my mountain goat side. Just about every weekend, Doug, his dad and I have climbed a 13,000- or 14,000-foot peak. Each time we do one of the hikes, we have been increasing the weight in our backpacks. Our last hike took us to 14,141-foot South Mt. Elbert. The hike was around 10 miles round trip and I was able to carry 45 pounds with 4,500 feet of elevation gain. I felt really strong and was ecstatic with the accomplishment because this is similar to what I will have to do on Rainier. I still have just over a month of training time before the trip so the plan is to keep doing hikes of this nature, including a few overnight trips, so that we can begin to move more quickly and efficiently on steep terrain with heavy packs. Some evenings after work I have also been going up to the Flatirons in Boulder, CO to hike some shorter and lower (though still steep) peaks.
On the summit of 13,5751 Rosalie Peak on May 26, 2013.Sneaking in a seven-mile hike of 8,144-foot Green Mountain after work on May 30, 2013. The sun was quickly setting!A few days later on June 2, 2013 we made it to the summit of 14,141-foot South Mt. Elbert.We tagged 13,588-foot Mt. Cosgriff on the way down.
So far, my joints have been doing great through my training regime. Part of this has to do with the comprehensive physical therapy program I am on. Between my shoulder, hip and Achilles exercises, I spend about 45 minutes most days on physical therapy. It taxes my schedule and makes me stay up later on some nights than I would like, but the benefits have been huge.
The other reason I think that my joints have been doing so well is that I discovered a new exercise: deep-water running. Hiking one or two big peaks each week with a heavy pack is hard on my joints, so in between I have decided to skip running, climbing, zumba and even biking to train as these all make my Achilles tendonitis flare up. I know I will return to all these activities when I get back from Rainier as my Achilles is basically already healed. However, for now I just don’t want to risk re-injuring it since things are going so well and I am able to hike long distances with elevation gain again. I had tried swimming to increase fitness, but the repetitive arm motions aggravated the avascular necrosis in my shoulder. I knew that I had to complement the long weekend hikes with something in order to get enough cardiovascular training in mid-week. But what activity?
I took to the internet to get some ideas and there I discovered the perfect training activity: deep-water running. Doing this exercise would help me build up cardiovascular fitness and muscle strength while giving my joints a chance to rest from the long hikes I was also doing. A quick Google search revealed several instructional videos on deep-water running. and it looked pretty easy. It basically involved putting on a floatation belt, going to the deep end of a pool and running almost like you would on land. The running form ends up being slightly different, but the videos provided enough guidelines that I felt confident to give it a go.
The first time I ventured to the gym to try the new activity I felt awkward because I didn’t travel very far when running in the deep end of a pool. On land, when you increase your running speed and intensity you generally travel a much greater distance. In the the pool, I can run as hard as possible and only travel 15 feet. It reminds me of crazy nightmares where I am being chased by ghosts, monsters or bandits and I am running really fast to get away but not getting anywhere. When I exhaust the length of the deep end, I turn around and head the other direction.
Suited up and ready to go in my floatation belt.With the belt keeping me afloat, I mimic the running motion I would do on land.
Running in small circles in this way doesn’t feel very interesting compared to running on a scenic trail, but I have to remind myself that it is really no different than running on a treadmill. However, the cardiovascular benefits are huge. Deep-water running really gets the heart rate up. Not to mention that the resistance the water provides has helped me build muscle–and not just in my legs. I move my arms underwater just like I do when I run on land, but because the resistance is so much greater, I have noticed my arms are getting a lot stronger too.
As on land, one has to pay attention to their running form in the water. I find that if I am getting lazy about form, I will start treading water instead of running. Treading water is not nearly as strenuous as running and does not get my heart rate up to an adequate training level. To make sure I am keeping my form, I will actually close my eyes and picture myself running on a trail or road and try to mimic that movement in the pool. Another trick that works well for me is to pick a stationary object on the edge of the pool and pretend it is another runner in a race that I am trying to catch. Both of these things help ensure that I stay in good form and keep my heart rate up.
For workouts, I usually deep-water run for about 45 minutes to an hour and then soak in the hot tub for 15 minutes which feels amazing on my joints. I have been deep-water running 2-3 times a week. A lot of people may be wondering if this influences my ostomy appliance wear-time. I find that being in the pool and hot tub this much does not affect my appliance’s ability to adhere. However, I change my appliance every three to four days regardless of what activities I do. Perhaps if someone was trying to get a seven-day wear-time, swimming might shorten it a bit.
I also do not have to do anything different to get my appliance to stay on in the pool. I basically jump in with my wafer as is (my wafer method is pictured in this post). Some people who have had issues with their appliances staying on in the water have great luck with products such as Sure Seals and Coloplast Brava Elastic Barrier Strip. I have tried both and they work well. I just find that my appliance sticks fine without them for the amount of swimming I do. If I were to take a beach vacation or a trip to a water park where I was in the water all day I would definitely use these. As far as swimming attire when I am deep-water running, I wear a variety of tankini tops with swim shorts and then an Ostomy Secrets Swim Wrap which covers the part of my pouch that sticks out above the low-rise swim shorts.
If you are looking for a gentle-on-the-joints exercise to gain strength I would recommend deep-water running. I only wish I had discovered this activity sooner after surgery. It would have been a great low-impact way to get back into shape once my incision was healed and I could return to water sports.
For now, it has become this octopus-mountain goat-fish’s best option for getting in shape for Rainier. It fits into the busy work schedule, is easy on the joints, and gets the heart pumping. I am feeling more optimistic then ever that as long as the weather cooperates for our ascent, I will be strong enough to stand on that summit.
Last weekend I was reminded why I love using closed-end ostomy pouches on hikes and climbs. I was up on a long ridge between between Loveland Pass and Mt. Sniktau in Colorado. Though it was a gorgeous 75-degree day down in Denver, up at 13,000′ it was blustery and frigid. We left the house at 4:15 a.m. so that we would be done with our climb and back to the car before afternoon thunderstorms came in. I emptied my appliance before leaving the house, but by the time we reached the summit of Mt. Sniktau at around 9 a.m., my pouch was reaching its 1/3 full point. This is typically when I like to empty it.
Problem was, no ideal place to empty a pouch could be found on the entire ascent. The wind was howling and shelter was non-existent. On top of this, there were many feet of snow on the ground. The few places where there was exposed earth, it was frozen solid. There was also no way to go off of the ridge to empty away from the trail. Precarious cornices sat 50 feet to the east of the route and dangerous avalanche slopes could be found 50 feet to the west. Emptying would have meant draining my pouch in the snow close to the area where people travel. Once the snow melted, fecal matter would have been left on top of the ground in a popular area. This was one of those instances when wearing a two-piece ostomy system and using closed-end pouches was almost a necessity.
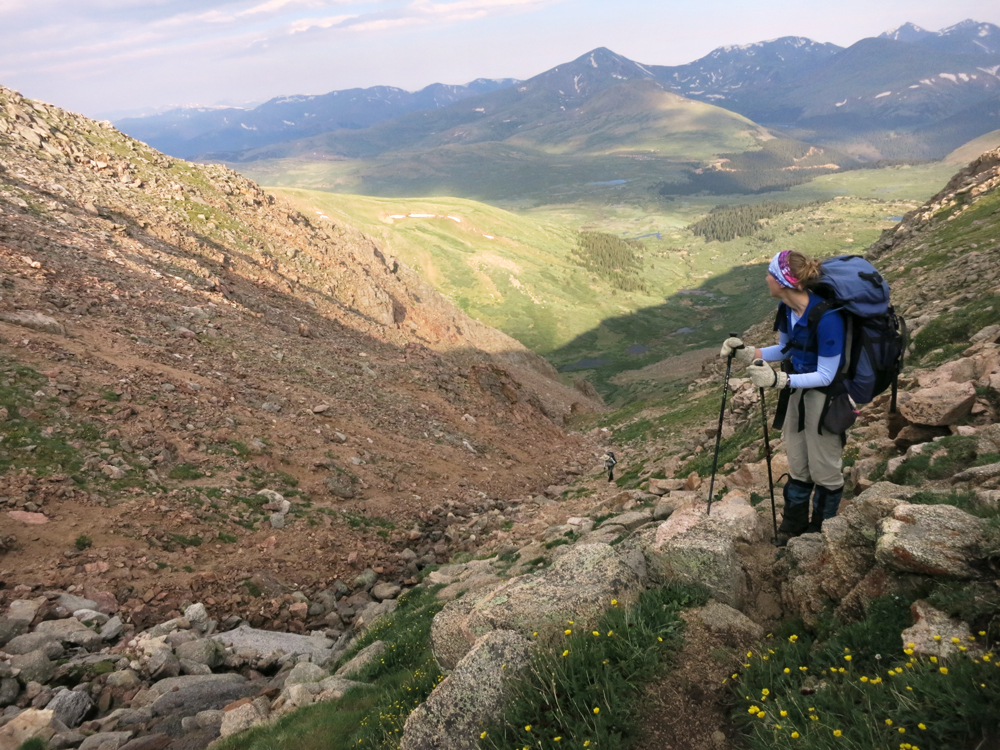
The ridge between Loveland Pass and Mount Sniktau provided few places to empty a pouch.
If you are just finding out that you will be having an ostomy, or are recently out of surgery you may find the sheer number of ostomy appliance choices to be overwhelming. Closed-end, drainable, one-piece, two-piece — what do all these mean and which ones are best suited for various outdoor adventures? A lot of these choices come down to a matter of personal preference. The goal of this post is to share some information on the basic types of appliances and explain how I utilize the various options on peaks and trails. I’d also like to hear what you’re using in the outdoors.
First, ostomy appliances come in one- or two-piece options. With a one-piece appliance, the wafer (also sometimes called a skin barrier) is permanently joined to the bag and cannot be separated–you’re literally stuck with this pouch until you remove the whole thing. The benefits of this style is that it has a low profile and sits very flat against the abdomen. The disadvantage is that because the wafer and bag cannot be separated, you lose the flexibility of being able to swap out different types of pouches unless you take the whole system off your belly. I used one-piece drainable pouches for the first five months after surgery, and on one of my very first major outdoor trips as an ostomate: a three-night early spring backpacking excursion. The ground was snow-covered and frozen on this adventure and I ended up trying to drain my pouch into plastic bags so that I could pack out my waste. It didn’t go well and I got output all over my pants and all over the outside of the bag I was trying to drain into. From that point on, I recognized that a two-piece system would be a better option for my outdoor trips.
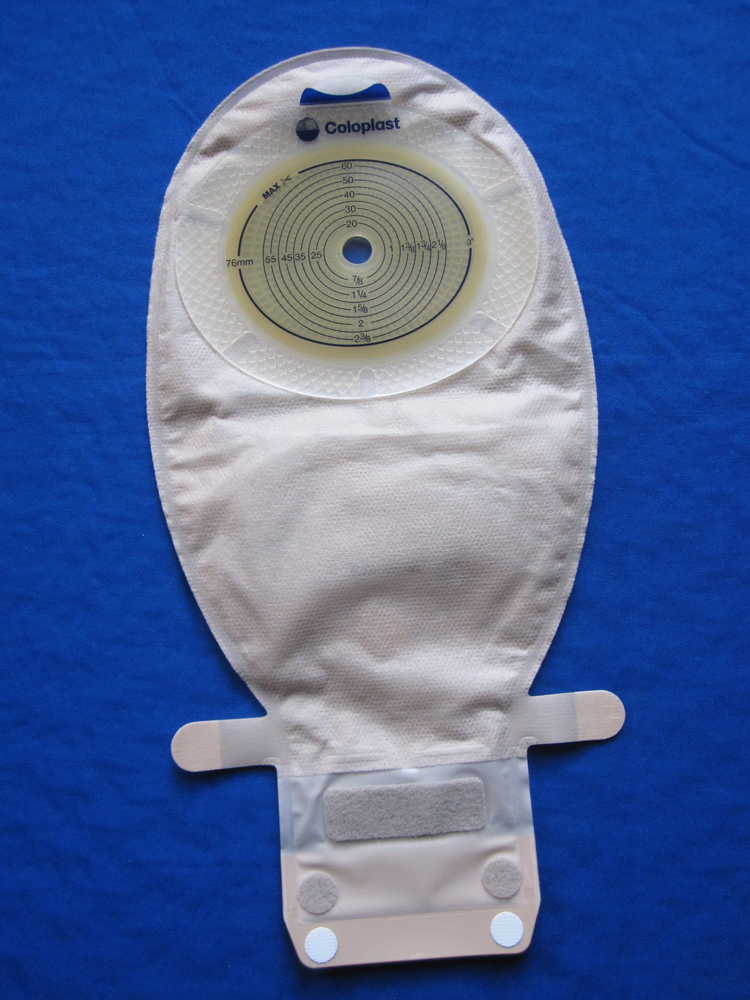
In a one-piece ostomy system, the wafer is permanently attached to the pouch. Because of this, swapping out different pouch styles on the same wafer is impossible. Pictured is a Coloplast SenSura X-Pro drainable one-piece appliance.
With a two-piece appliance, the wafer and pouch are separate and attach to each other with a plastic ring that snaps together much like Tupperware. Once the wafer is on your belly, different styles of pouches can be put on or taken off this ring. These systems are a little higher profile because of the plastic ring. However, there is much flexibility in using them because you can swap out different types of pouches depending on your activities. Due to this, a two-piece appliance is my clear choice for outdoor adventures. Also, I find that even with the plastic ring, two-piece ostomy systems are undetectable under my clothing.
There are also choices for the pouch portion of an ostomy appliance; they come in drainable or closed-end versions. Drainables have a tail that unfolds so that output can be emptied out of the bottom. Once the tail of the pouch is wiped clean, it rolls up and closes with either a clip or a Velcro strip until it needs to be emptied again. A person with an ostomy may use the same drainable pouch for multiple days.
Closed-end pouches have no tail. Once they fill up, they are designed to be thrown away full. Due to their simpler design, they cost less per bag than drainable pouches. However, most ileostomates don’t use them the majority of the time. Due to output coming directly out of the small intestine having higher water content, those with ileostomies usually have to empty their pouches six times a day or more. Even though closed-end pouches have a cheaper per-pouch cost, going through so many in 24 hours makes them impractical and not cost-effective. Generally closed-end pouches are better suited for those with colostomies who may only have to empty a few times a day. That said, there are occasions when closed-end pouches are the perfect tool for those with ileostomies too.
With a two-piece system, the pouches can be separated from the wafer and swapped out. On the left is a drainable pouch and on the right is a closed-end one. Pictured clockwise is a Convatec Sur-fit Natura drainable pouch with an Invisiclose tail, a closed-end pouch, and a Durahesive cut-to-fit wafer.
Drainable pouches are my preference most of the time, even on wilderness adventures, as long as I can find a good place to empty. Packing out full closed-end pouches can be heavy due to the high water content of ileostomy output. In fact, I once weighed the trash bag that contained a day’s worth of full closed-end pouches after an all-day climb and it came in at 3.5 pounds! Multiply that for trips that may be several days long and you can see why I use closed-end pouches only when necessary.
However, my hike on the ridge is an example of an ideal time to use a closed-end pouch. I also like using closed-end pouches in other places where it is impossible to empty: on cliff faces when climbing, on rocky peaks where it is impossible to dig a cathole, and on crowded urban trails. Though I haven’t been on a river trip with my ostomy yet, I can also see them being very useful in these situations when one cannot get far enough from a water source to empty. Also, it takes longer to dig a hole in the ground and properly drain my pouch when in the wilderness than to swap out a pouch. There have been a few times when I have been caught in storms and have decided to swap to a closed-end pouch instead of draining in order to minimize my exposure to lightning, high winds, cold rain or other dangerous elements. Both drainable and closed-end options also come in smaller sizes if one wants a tinier pouch for some activities such as swimming.
It is also worth mentioning that there is one other style of two-piece ostomy appliances; they are called adhesive coupling systems. Instead of having a plastic Tupperware-like ring like traditional two-pieces, the wafer has a smooth plastic area and the pouch affixes to this with a sticky adhesive ring. The benefit of these is that, without a plastic ring, they are very flat on the belly. You can still swap out pouch styles by peeling off the old bag from the wafer and sticking on a new one. However, I find that adhesive coupling appliances don’t work well on my outdoor trips . When I peel off the full pouch, a little output inevitably gets on the place where I am supposed to affix a clean one. I then have to fully clean this in order to get the fresh pouch to stick. It ends up being too messy and hard to deal with in the wilderness where there is no water to clean up with. I find it much easier to use the traditional two-piece appliances with plastic rings. Even if a small bit of output gets on the ring, it still snaps together fine and is not messy at all.
In adhesive coupling two-piece systems, the wafers and pouches adhere together with an sticky ring. They are wonderfully low profile, but I find them messy to swap out when on outdoor trips. Pictured on the left is a Convatec Esteem Synergy adhesive coupling system and on the right is a Coloplast SenSura Flex wafer and pouch.
A downside of closed-end pouches is that they are a disposable item. I try to make the best environmental choices possible in my daily activities, so I do sometimes cringe when I throw away my bag of closed-end pouches after a climb knowing I have added more to the landfill than I would have if I would have stuck to a drainable that day. I try to remind myself that I do this for a medical reason and to deal with a basic life process of bodily waste removal. In other aspects of my life, I try my best to be gentle on the earth. I take reusable bags to the store, drive a fuel-efficient vehicle, use public transit, buy organic produce to protect wildlife from pesticides, use eco-cleaners to keep toxins out of our water supply, recycle every item possible, and make wise purchases. I hope that, in the grand scheme of things, the impact of the pouches that I throw away is small. I really do only try to use them when absolutely necessary.
When I was on Mount Sniktau on Sunday and decided draining wouldn’t be possible, I even began to wonder if I could find a good place to take off my full pouch and put an empty closed-end one on. It was so windy and there were people everywhere on the ridge. Once my pouch was 1/3 full, I couldn’t find a place to make the switch. I decided I would wait until later to deal with it. The good thing about my ostomy is that, unless I eat something that irritates my stomach and gives me pure liquid output, I have plenty of time to get around to emptying. It is rarely urgent.
On the summit of Sniktau. It was really cold and windy up there with very little shelter.
As I made my way down the ridge from the summit, more and more people were coming up and I realized I couldn’t be fussy with my site selection for swapping. My pouch was now 1/2 full and I needed to take care of it soon. I ran ahead of Doug and his dad but also saw that some people were heading towards me. I had about 5 minutes before they reached me so I tossed my pack to the side of the trail next to a small pile of rocks and tried to create a wind break. I then dug my supplies out and tied a small doggie poo bag to my pack strap so it wouldn’t blow away (this is what I would throw the full pouch into). Next I pulled down the front of my pant waistband, took my hernia prevention belt off, and quickly swapped out the full pouch for the clean one. Just as I had gotten my clothing back into place and was bagging up my trash, the two hikers approached me. I said hello and we talked for a second about the route. They clearly had no idea I had just dealt with my ostomy. To them, from a distance it probably looked like I was futzing around with my clothing or backpack. One can very discreetly manage their ostomy on the trail with a two-piece system and closed-end pouches.
With all the options out there, it pays to experiment with all the different brands and styles. Don’t feel like you have to use only one type of appliance. Have a dressy occasion where you definitely don’t want your appliance to show? Wear a sleek one-piece that week. Hanging out at the beach all day? Go for a mini drainable pouch that won’t hang out beyond the bottom of your suit. And if, like me, you find yourself needing to empty on a wind-swept ridge with sheer drop-offs on both sides — a two-piece with a closed-end pouch may be just the ticket. Take advantage of all the products out there to make life with your ostomy the best it can be.
This is the spot along the trail where I switched out my pouch. By the time Doug caught up and snapped this photo, I was already finished managing my ostomy and was changing my camera battery. However, from a distance, swapping out a pouch doesn’t look much different than this. It can be done very discreetly.
Last Tuesday evening, I left work in a gorgeous swirl of falling snow but promptly got stuck in standstill traffic due to slippery road conditions. I half-thought of exiting the freeway and heading home, but the destination was too important and I knew that getting there would soon melt away any stress that had accumulated on the drive. In fact, it was almost guaranteed that I would leave the event in a good mood. I always do. So where was I heading that had me filled with such eager anticipation?
The fourth Tuesday of every month is my Ostomy Association of Metro Denver meeting. I started going to these meetings as soon as I was healed enough after surgery to get to them and quickly discovered how valuable they were. When you have a condition that is hard to talk about with most people, there is a feeling of instant comfort that comes from being surrounded by others who immediately understand what you are going through. A place where it is okay to talk about normally taboo subjects such as gas, rectums and bowel movements. Now that I have been attending the meetings for almost two years, I cannot imagine not having this support system in my life. I absolutely love talking to those who are facing or recovering from surgery and doing what I can to offer encouragement. I head home from every gathering wishing I had more time to talk to everyone and eager for next month’s meeting to arrive.
One thing that I hear many young people on IBD and ostomy internet forums say is how they often walk into such meetings and feel that they are the only one in their age group there. Many times these people don’t come back for this reason, and I think it is really unfortunate. Regardless of age, everyone can relate to the overwhelming emotions that come with ostomy surgery. Though different for each person, we all have stories of difficult times, fears we are facing, successes we are celebrating and hopes and dreams for our lives beyond illness. Coming together to share our experiences and thoughts on these things can offer profound opportunities for healing. I love the conversations I have at the meetings and learn something from every single person there whether they are 25 or 70 years old.
And guess what? If you wish that there were more people at the meetings your age– stick around. The next time someone else your age is nervously walking down the hall towards the meeting room and peeks in, they will see you there and feel less apprehensive. If that person chooses to also come back next time, it has a ripple effect and soon the group becomes more diverse. Make the meetings be what you want them to be by participating and returning for the next one.
If you don’t have access to a local support group to meet people in person, there are many groups to join on the internet. I wrote a post a while back about the importance of reaching out to others online. One of my biggest twists of luck when I was in the hospital and facing the possibility ostomy surgery was that my room had a good internet connection. Whenever my favorite nurse would see me typing away on my computer at an intense pace, she would always remind of how fortunate I was to be in that room because many of the others on the floor had poor Wi-Fi signals. I don’t know what I would have done without my computer. It became a lifeline from my isolated hospital room and allowed me to meet others who had gone through surgery and gone on to lead active lives.
Because of my own experience in reaching out for help when I was sick, it is a huge priority of mine to try to answer every single comment and email I receive on this site. Sometimes it takes me a little while due to a busy schedule, but you will hear from me if you write. Last fall, an email appeared in my box from another local adventurous ostomate: Lewis Benedict. That initial contact led to other opportunities to meet up including a recent hike of Twin Sisters Peaks in Rocky Mountain National Park. Lewis is now working on his own ostomy awareness website, ostomatevillage.com, and was even on cover of The Phoenix magazine this quarter! I am so proud of his accomplishments and look forward to many future adventures with Lewis and his wife, Tara.
Our group (including Lewis and Tara of Ostomatevillage.com) poses atop one of the Twin Sisters Peaks in Rocky Mountain National Park. Check out the video below for more on the adventure!
I am thankful everyday that I have met so many amazing people through my ostomy association meetings, OstomyOutdoors.com, and other websites and social media. You all inspire me to no end and help keep me motivated when my own life presents challenges.
I am going to end this post with a video of the hike with Lewis mentioned above. I hope it provides some inspiration to get out there and meet other people with ostomies. If you are feeling alone while facing or recovering from surgery, or if you just want to meet other people who have been through similar things, know that there is a strong ostomy community out there. You just have to reach out.