Marshmallows and paper towel hats: tips for anytime appliance changes

The main room of our condo during a recent vacation with Doug’s parents looked a bit like an outdoor gear store. Snowboards and skis of all sorts lined the wall and a plethora of boots sat in front of the fireplace. Closets, dressers and duffel bags overflowed with Capilene, fleece and Gore-tex clothing. During a week in the mountains near Winter Park, Colorado, we took part in two days of biathlon racing, and one day each of skate skiing, snowboarding and telemark skiing. I also managed to squeeze in some hiking and sketching in my nature journal in Rocky Mountain National Park. With so many activities on the schedule–some of which required an early start–it was hard to know when to fit in my appliance changes.

Our vacation included to days of biathlon racing.
Our vacation included two days of biathlon racing. I would rather change my appliance after dinner and face the biggest volcano of ostomy output than get up at 4 a.m. to change my appliance before a race.
I also put on my telemark skis after not using them for eight years (and then could barely walk for the next week.) I am trying to relearn this skill so I can use my tele skills to get out to some Colorado ski huts next winter. Stay tuned for a post in 2016 about changing your appliance in a communal ski hut.
I also put on my telemark skis after not using them for eight years (and then could barely walk for the next week.) I am trying to relearn this skill so I can use it to take trips to Colorado ski huts next winter. Stay tuned for a post in 2016 about changing your appliance in a communal ski hut.
Since I could barely walk after my day of telemark skiing, I opted to sit down and sketch in my nature journal for one day of the trip.
Since I could barely walk after my day of tele skiing, I opted to sit down and sketch in my nature journal for one day during the trip.
My snowboard was feeling left out, so I took it out for one day on the slopes. My legs were so tired from days of non-stop winter sports, that I completely lost the ability to make my board turn after a few runs. Note to self-- sliding down the entire front side of the Winter Park Resort on your heel edge is not much fun. Best to take a rest day instead.
My snowboard was feeling left out, so I took it out for one day on the slopes. My legs were so tired from days of non-stop winter sports, that I completely lost the ability to make my board turn after a few runs. Note to self– sliding down the entire front side of the Winter Park Resort on your heel edge is not much fun. Best to take a rest day instead.

Unfortunately, appliance changes aren’t that quick for me. Due to pretty acidic ileostomy output, I have to protect my skin with several layers of products. Stoma powder, skin prep, Duoderm, Eakin Seals and paste–I use them all. My changes usually take at least 30 minutes–sometimes longer.  Even when I use all those products, my output chomps through them like a piranha if I try to go longer than three or four days, and I end up with very raw and painful skin.

The the saying "simple is better" does not apply to my appliance changes. I need a lot of layers of products to protect my skin. Putting on all this stuff takes a lot of time and gives my stoma ample chances to expel output everywhere.
The saying “simple is better” does not apply to my appliance changes. I need a lot of layers of products to protect my skin. Putting on all this stuff takes a lot of time and gives my stoma ample chances to expel output everywhere.

Those with an ileostomy know that it can be pretty hard (if not impossible) to find even a short chunk of time when your stoma isn’t pooping. Usually I try to change my appliance in the morning as that is when my stoma is the most quiet. However, on a busy ski vacation (or any time with a full schedule) that plan doesn’t always work. If I already have to wake up at 5 a.m. to make it to a race on time or catch first tracks in powder, it is hard to get up even earlier to fit in an appliance change. Also, I don’t like worrying about when I am eating and how it will impact my appliance swap. If I want to head out to a restaurant for a post-ski meal later in the evening, I go for it even if I know it will be harder to change in the morning due to the extra output. In some cases I will even switch out appliances in the evening right after a big dinner (gulp!) if that is the best way to fit it into my schedule.

If you are wondering if I have a particularly quiet and cooperative stoma, the answer is no. My stoma is a non-stop workhorse and churns out output 24/7.  Fortunately, I have some tricks that allow me to change at any time of the day even when my stoma is active.

Trick number one: Marshmallows
My stoma nurse first let me in on this little secret. If I eat four to six regular-sized marshmallows about 15 minutes before a change, my stoma will usually stop outputting for about 30 minutes–just enough time to finish getting my appliance on.  I can’t make any promises that it will work for you, but I recommend giving it a try. It is the only time you will get to eat marshmallows for health reasons. I have no idea why the very first individual to discover this trick was dining on marshmallows right before changing their appliance, but I sure am thankful for their sweet tooth!

This photo isn't from our winter vacation but does show my love for marshmallows. They are best over a campfire, but I will happily eat them cold before a 5 a.m. appliance change.
This photo isn’t from our winter vacation but does show my love for marshmallows. They are most delicious when toasted over a campfire, but I will happily eat them cold before an early morning appliance change.

Trick number two: Make a hat for your stoma
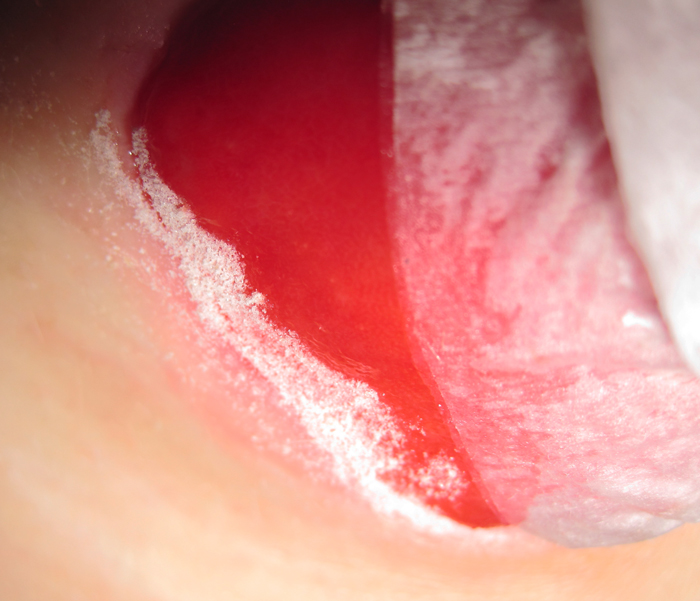
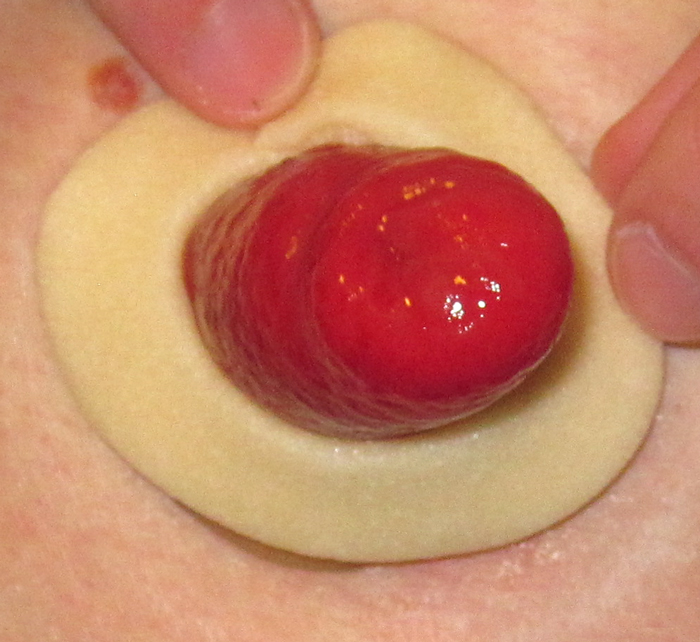
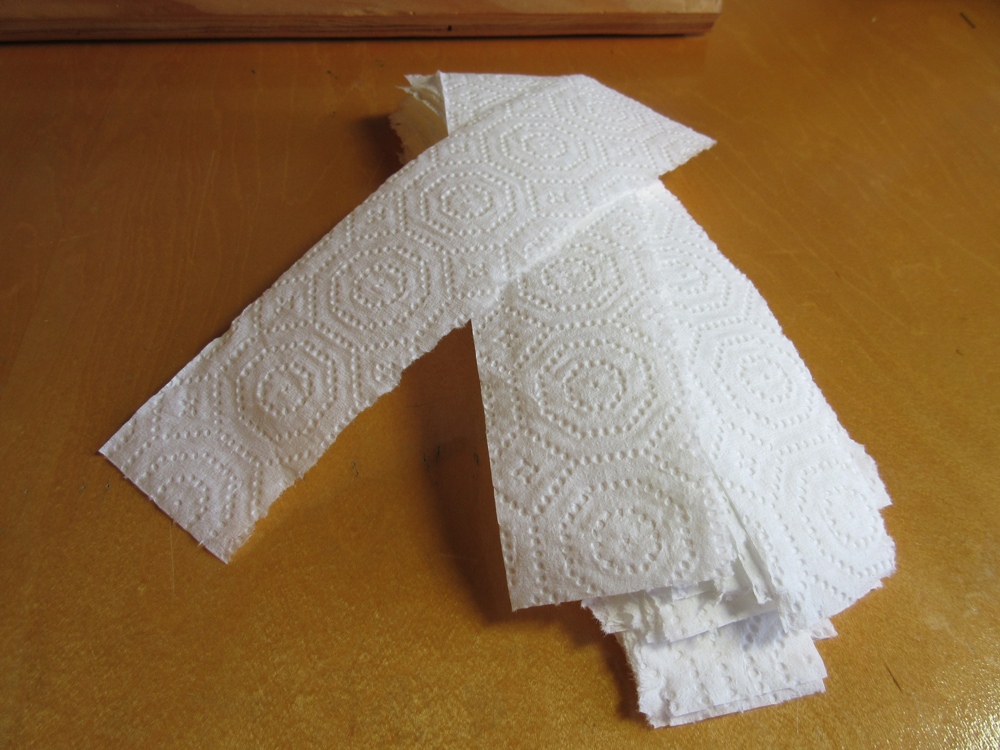
When I first got my ostomy, I absolutely dreaded changes. They were tear-filled endeavors wrought with frustration because I couldn’t get my barrier ring and wafer on without my stoma pooping all over the place and ruining the adhesives. I turned to the internet for ideas to solve this problem and discovered a post on a forum that suggested wrapping the tip of my stoma with a strip of paper towel. I gave it a try and couldn’t believe how well it worked! Plus I liked that it made my stoma look like it was wearing a cute hat.

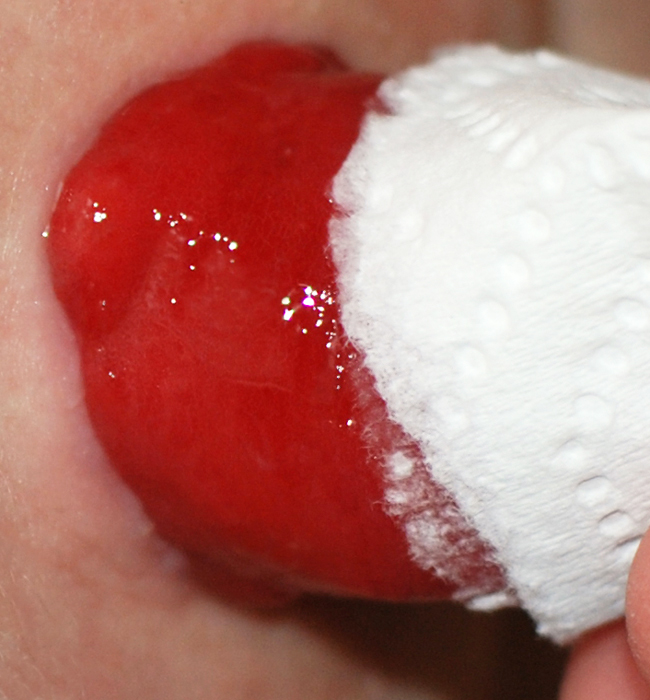
Four years later, and I still use this method during every single change. As my stoma chugs out stool, the little hat fills up. When it has reached maximum carrying capacity, I simply pop it off, toss it in the trash can next to me, and wrap on another. Along with collecting output, the stoma hat frees up my hands to put on powder, barrier film, and all the other products that I use to protect my parastomal skin. It also keeps the base of my stoma dry as it absorbs some of the moisture from the mucous membrane.

This little trick allows me to change whenever I need to as it doesn’t matter if my stoma releases output; the hat is always there to catch it. Occasionally, if my output is profuse and watery during a change, the technique doesn’t work as well. However it is better than nothing, and if my output is watery, sometimes gulping down a few extra marshmallows will temporarily slow down the flow until I can finish the change.

I realize that making a hat for a flush stoma won’t work very well, so this trick works best if your ostomy protrudes from your belly a bit.

The only supplies needed for a stoma hat are one-inch-wide strips of paper towel.
JWilbur my stoma models a poo-catching paper towel hat. To make one, simply wind the paper towel strip around the top of our stoma and you are set to go.
My stoma, Wilbur, models a stylish poo-catching paper towel hat. To make one, simply wind the paper towel strip around the top of your stoma and you are set to go.
It is easy to slid your wafer right over the stoma when it is wearing a hat. Note that under the wafer, I have already put on my Eakin ring and other materials.
It is easy to slide your wafer right over the stoma when it is wearing a hat. Note that under the wafer, I have already put on my Eakin ring and other materials. If you are using a one-piece appliance, you can still use the hat method. Just pop the hat off right before you put your appliance over your stoma.
All pouched up with no mess at all. For those who are wondering about the tape job, I love Convatec wafers but the tape irritates my skin. I cut it off and add my own strips of Medipore tape.
All pouched up with no mess at all. For those who are wondering about the tape job, I love Convatec Durahesive wafers, but the tape irritates my skin. I cut it off and add my own strips of  3M Medipore tape. This combo adheres well through showering, swimming, and all sorts of sweat-inducing sports.

If you feel your ostomy controls your life and confines you to a certain schedule, keep searching and experimenting to find solutions. I’d never have guessed that something as simple as marshmallows and paper towel “hats” would give me the freedom to live with my ostomy on my terms rather than the whims of my stoma.

Using Duoderm to protect peristomal skin

What’s a mountain girl to write about when my hip injury is keeping me from the slopes and summits? Skin care, of course! After all, taking care of your peristomal skin is of utmost importance. It is hard to enjoy outdoor sports if your skin is irritated and painful or if your appliance won’t stick to weepy, damaged areas.

My stoma is fairly long at 1.5″and doesn’t have the best posture. It flops downward and a bit to the right — especially under the weight of my clothing and pouch. This actually  works great because my output goes toward the bottom of my pouch which helps prevent leaks. On the downside, the area of skin just under my stoma sometimes gets irritated because stool tends to collect in that spot. Also, as my stoma flops down, it compresses my Eakin barrier ring in that area and causes it to erode more quickly. Fortunately, I discovered a great solution to this problem soon after surgery thanks to the help of my home health nurse.

When I don't protect the skin underneath the area where my stoma flops over, I get a strip of irritation.
When I don’t protect the skin underneath the area where my stoma flops over, I get a strip of irritation.

There was a six-week time period after my surgery during which I had a complication with my mid-line abdominal incision (due to a rare reaction to sutures). I ended up having to leave the wound open for healing with the help of a wound vac. While this was certainly a disappointment at the time, the situation also held a hidden blessing. Every other day, a home health nurse would come and change the sponge dressing for my wound vac. In order to do this, my ostomy wafer had to be removed and replaced each time. Along with being a wound vac guru, my home health nurse also had a great knowledge of ostomy skin care. Having the nurse watch and help me change my appliance so frequently over a period of many weeks provided an amazing opportunity to practice the task and troubleshoot problems. As time progressed, my nurse saw that a sliver of skin under my stoma was consistently raw.  She told me that this would likely become a chronic issue unless I did something to better protect that section of skin. I was already using Eakin barrier rings, so she suggested I add a product called Duoderm Signal to my ostomy system.

Duoderm Signal comes in a 4″ x 4″ sheet and custom-sized pieces can be cut out of it to cover whatever area needs protection. To care for the sliver of skin right under my stoma, I cut a 1/2″ by  1″ comma-shaped piece that contours with the edge of my stoma. When I place it on my skin in the trouble spot, it provides a much needed extra layer of protection. When my Eakin barrier ring erodes a little sooner in that section, my output touches the Duoderm layer instead of my skin.

Duoderm can be placed right on the skin, but it does not adhere well if the area is wet. Therefore, if I get irritation that is weepy,  I must put a layer of stoma powder and skin prep under the Duoderm in order for it to stick. The best way to do this is to use the “crusting” method. First I put a small bit of powder on the sliver of skin that is irritated. I then dab it with 3M Cavillon Skin Prep. Once it dries, I add one more layer of stoma powder and one more layer of Cavillon. I give the area a final dry with a hair dryer on a low setting for a few seconds. Then, I add the strip of Duoderm over the crusted area. Finally, I put my Eakin barrier ring over the Duoderm followed by my wafer.

This method works wonderfully to protect the skin under my stoma. However, I can’t stretch wafer changes longer than four days when using the Duoderm. If I do, the Duoderm will start to peel up from being so close to my wet stoma. Then output starts to seep under it and cause skin breakdown.

If I develop a sore under my stoma, I put a layer of stoma powder just on the tiny sliver of irritated skin. I then dab the powder with Cavilllon skin prep to form a seal over it. Once dry, I add one more layer of stoma powder followed by one more layer of Cavillon skin prep. This forms a "crust" over the sore that the Duoderm can stick to. The stoma powder also helps heal the sore.
If I develop a sore under my stoma, I put a layer of stoma powder just on the tiny sliver of irritated skin. I then dab the powder with Cavilllon skin prep to form a seal over it. Once dry, I add one more layer of stoma powder followed by one more layer of Cavillon skin prep. This forms a “crust” over the sore that the Duoderm can stick to. The stoma powder also helps heal the sore.
A small piece of Duoderm Signal adds another layer of protection for my skin. I put the Duoderm under my Eakin barrier ring. Both of these things then go under my wafer.
A small piece of Duoderm Signal adds another layer of protection for my skin. I place it right on top of the stoma powder/Cavillon skin prep “crust” in the photo above. If I happen to not have a weepy sore and just want to protect the skin, I skip the powder and Cavillon step and place the Duoderm right on my skin.
I place my Eakin barrier ring over the Duoderm. You can see the Duoderm peeking out in this photo.
I place my Eakin barrier ring over the Duoderm. You can see the Duoderm peeking out towards the bottom of the ring in this photo.
The Duoderm and Eakin barrier ring protect the trouble spot beautifully and help me maintain healthy paristomal skin. As long as I put the Duoderm on at every change, I rarely get a sore anymore unless some output happens to seep under the Duoderm. In these cases, the layer of stoma powder and Cavillon mentioned above clears it up by the my next change.
The Duoderm and Eakin barrier ring protect the trouble spot beautifully and help me maintain healthy peristomal skin. As long as I put the Duoderm on at every change, I rarely get a sore anymore unless some output happens to seep under the Duoderm. In these cases, the layers of stoma powder and Cavillon mentioned above clear it up by my next change.

Some people with ostomies are lucky enough to be able to stick their wafer right to their skin with no additional products. Unfortunately, that does not work for me. I need to build up several layers of things in order to maintain healthy skin. As soon as I try going back to more simple methods, my skin suffers. Appliance changes typically take me over 45 minutes if I include the time it takes to set up my materials, remove my old appliance, shower and do all the steps to get my new wafer on well. I never worry about it. It is not a race. Having my appliance off for a little while actually helps my skin get some fresh air. Between eating about five marshmallow prior to my change to slow down my output, and then wrapping paper towel strips around my stoma to catch any stool that might come out as I work, things go fairly smoothly when having my appliance off for that long. Of course there are always those days when my stoma doesn’t cooperate! Still, even with the occasional mishap, taking the extra time needed to better protect the skin around my stoma is worth it. Having happy skin helps me feel good about my ostomy and gives me confidence that my appliance will adhere well through all my adventures.

I do have one more skin care tip that I use which involves using both an Eakin ring and stoma paste, but that will have to wait for a future post!

Ring around the stoma: my best defense against leaks

In approaching the two-year anniversary of my ostomy surgery, I was looking back at an email I wrote to Doug from the hospital during my final severe UC flare. A few days before writing it, I had received my very first infusion of Remicade. It had worked wonders to get my symptoms under control, but I did not want to take such a potent drug for the rest of my life if it could be avoided. I was strongly leaning towards pursuing surgery once I got out of the hospital and wasn’t so sick and weak (a decision that became much clearer when side effects of the drug became more than I could bear). Even though I was quite confident that I wanted surgery, I was still scared of getting an ostomy due to the horror stories I read on the internet–especially the ones that revolved around leaks. I had just read a worrisome tale on the web when I sent this message:

October 2, 2010

Doug,

This all sounds so complicated and overwhelming. I DON’T want to be infused with drugs the rest of my life but this sounds so hard too. What if I can’t find a way to go climbing or backpacking without creating a leaky poopy mess? Are you confident we will be able to figure this all out together without getting fed up? Maybe it feels different when someone faces surgery in an absolute emergency, but I am choosing this aren’t I? Need some reassurance.

-Heidi

Despite the fears, I knew in my heart that surgery was the route I wanted to take to treat my ulcerative colitis. I met with my surgeon and was then scheduled to meet with my “wound, osotmy and continence nurse” (WOCN). I had lots of questions for her, including several about leaks. She assured me that once I found the products that worked for me, leaks should not be an issue. I liked that answer, but I wasn’t sure I believed it. From all the things I read, leaks just seemed like a given with an ostomy. After my surgery, I stocked my car with spare pants, put waterproof pads on the bed when I slept, and bought a collapsible wash basin to wash potentially poopy clothes on future backpacking trips.

It didn’t take long to experience my first leak. Shortly after I got home from the hospital, wound drainage got under my wafer while I was sleeping and broke down the adhesive. Though not a huge disaster, a little bit of stool did escape. I had been using a strip paste right around the opening, but it did not adhere to my skin well. I decided to set up an appointment with my WOCN to see if she could troubleshoot my problem. After hearing about what happened, she left the room and came back with something that looked like a flat donut made out of Silly Putty. It was called a barrier ring. She showed me how to put it on, gave me a few extras, and told me how to order more. I left the office hoping for the best.

So how long was it until the next leak? It has been almost two years since that appointment and I have yet to get another one. My nurse was absolutely right when she said finding the right products is crucial. For me, a barrier ring was all I needed to become confident that output would not seep out from under my wafer. Whenever people mention leaks, the first thing I ask them is if they have tried a barrier ring.

Barrier rings come in many different brands. The first one I tried was an Adapt Ring by Hollister. I used these for four months and liked them a lot. However, I later tried an Eakin Cohesive Seal by Convatec and found that they were more resistant to erosion from my output and stuck to my skin very well–almost melting onto it. Some people don’t like this because the residue is hard to remove. However, that stickiness is exactly what makes them work so well for me; nothing gets beyond the Eakin. I also tried a ring by Coloplast, but so far, the Eakin Cohesive Seals are my personal favorite. Everyone is different, so it pays to try every brand to see which is the best fit for you.

The other thing I love about barrier rings is how well they protect my skin. Wilbur, my stoma, is an active guy. He wiggles, dances and expands and contracts a lot. To leave room my stoma’s gymnastic routines, I cannot cut my wafer too close to it and need to leave about 1/8 inch of my skin exposed. A barrier ring swells up to fill in this space. At first I was a little shocked by how much the barrier ring turtlenecked around my stoma when it was exposed to moisture, but I soon realized that this is exactly what they are designed to do in order to protect the parastomal skin.

The following photos show my favorite way of attaching a barrier ring. This method minimizes the chances of getting the ring wet which allows it to stick to the skin very well. Along with using a barrier ring, I change my appliance every 3-4 days. Beyond that time frame, my Eakin Cohesive Seals erode and leave my skin exposed.

The barrier ring I use: the Eakin Cohesive Seal.
First, I stretch the hole in the ring to match the size of my stoma. Then I tear one side. (Yes, it appears a manicure might be in order… rock climbing is hard on the fingertips).
After drying off  my skin very well, I hook the ring around my stoma.
I then press the torn edge back together.
Finally, I place the wafer over the barrier ring. You can see the 1/8″ space around my stoma and how the ring fills it in. Within an hour, moisture will cause the ring to swell and turtlneck up the side of the stoma about 1/4″. This keeps output from seeping under my wafer while also protecting my parastomal skin. (See the Skin Sleuthing post to read about the taping method pictured).

Nowadays, the spare pants sit unused in the car (well except for the one time they came to the rescue when I dropped my tail and spilled output all over my trousers), the package of waterproof pads is gathering dust in the closet, and I have not had to do laundry on any backpacking trip. It doesn’t matter whether I am climbing in 95-degree temperatures, snowboarding in the frigid cold or swimming at the pool. I always feel confident that my appliance will not leak during any of my activities when I use a barrier ring. Even in the rare instances when my wafer has peeled up, my barrier ring has always held tight and maintained the seal.

So if you are having leaks and haven’t tried a barrier ring, I highly recommend getting a sample and giving it a go. If the ring doesn’t prevent your leaks, meet with a WOCN and see if they have any other recommendations. Talk with other people with ostomies on the internet or at local ostomy support groups and find out what they suggest. With the right products, leaks with an ostomy shouldn’t be a given; they should be the exception.

Skin sleuthing

No more itchy-scratchy. I recently healed a rash under my wafer that had been plaguing me for about four months. In the process, I discovered that figuring out the cause and solution to ostomy skin problems can take some serious detective work. Solving my stubborn case involved some help from my stoma nurse, medication, a wacky new wafer method, and a touch of inspiration from a childhood memory.

I grew up with two brothers, and sometimes we would get into spats. When these unfortunate events happened, I could handle hair pulling, pinching, being kicked and even getting spit at. However, there was one method of sibling warfare that I absolutely dreaded: the snake bite. This involved having my forearm gripped with two hands while the skin was twisted in opposite directions at the same time until a painful sting ensued. A well-executed snake bite would leave my arm red and throbbing.

On several occasions since getting my ostomy surgery, I was certain that my wafers were giving me snake bites.

When I was healing up from surgery and researching ostomy appliances and sports, I read that some people have trouble with their wafers sticking in warm weather due to sweating. As I got back into outdoor activities, I fully expected that this would be the main wafer issue I would have to deal with when doing active sports. However, this ended up not being the case at all; my wafers adhered well through any activity. Instead, I was faced with an entirely different problem related to my ostomy appliance and strenuous sports.

When I was hanging out at home in the months after surgery, I had absolutely no issues with my wafers causing any skin issues. However, once I healed up I started biking and hiking, it seemed like my wafer would get pulled in one direction as I moved, while the skin underneath wanted to move in another. The Coloplast wafers I wore for the initial months after surgery were made out of a fairly non-pliable plastic, and would leave a circle of painful blisters on my skin right around the outer edge of  the wafer from this tension. I decided to experiment with a different brand.

I tried Hollister and then Convatec and found that the Convatec ones seemed to move the best with my body contours and movements. I had no further skin issues with my wafers for the first 10 months when I was mainly hiking, snowboarding and biking. Then in January, I started to do activities with more extreme movements, like yoga and climbing, on a weekly basis. All of a sudden, my wafers felt like they were giving me snake bites again–especially near my hip bone.

I have a narrow body, but my stoma measures 1.5 inches at its widest spot. This forces me to use larger sized wafers. When I put a wafer on, it extends past my midline incision scar on one side, and over my hip bone on the other. As I would do high steps while climbing, and twists and bends in yoga, my wafer would pull at my skin at the top of my belly and also near my hip bone. At first I tried protecting my skin with various brands of skin prep, but none made any difference. I tried to stand up while putting on my wafers and made sure I wasn’t pulling the tape part too tight while placing it on my skin. Neither of these things helped. As I was experimenting, I soon realized I had a bigger problem: a very itchy rash began to develop under the tape in the location where my skin had been pulled. Over a matter of weeks, the rash spread to other areas under the hip-bone-side of my wafer.

It was time to seek some help from my stoma nurse. After hearing about my symptoms, she felt it could be a yeast infection and recommended anti-fungal powder. I tried this for three weeks with no improvement.

In the meantime, I started to wonder if perhaps I had developed an allergic reaction to the tape part of my wafers. I really hoped this wasn’t the case. I didn’t want to have to change my ostomy system. I loved the way my wafers stuck so well through sports and swimming, and all my hernia belts and pouch covers were designed to work with my system. I thought an allergy was unlikely though, since there was no rash under the entire left-hand side of the wafer. If I had an allergy to the tape, I assumed it would show up under the entire tape part. Just to rule it out though,  I decided to try Convatec’s tapeless wafers for a couple of weeks. My skin did not clear up and continued to get worse.

It was around this time that I recalled another memory. Several years ago, long before my ostomy surgery, I had a nasty, itchy rash that started on my knee and soon spread to my arms and legs. I went to a dermatologist and was diagnosed with bacterial folliculitis. The doctor felt that I had probably nicked my leg shaving and had some hair follicles get infected which eventually spread to follicles on other areas of my body. It took a while, but it finally cleared up with antibiotics.

The rash I was dealing with under my wafer looked exactly like that rash. To top it off, I now had a little area of rash on my stomach far away from my wafer. My stoma nurse recommended that I talk to my doctor to get a prescription for antibiotics. My doctor agreed that it looked like folliculitis, and I began to take Keflex. Within a week of starting the antibiotics, the rash that I had been dealing with for several months completely disappeared. Finally the mystery had been solved! I deduced that the pulling of my skin under the tape had damaged it and allowed a bacterial infection to set in. Without the Keflex, I am positive my rash would not have gone away.

The problem was, I soon felt the familiar sting of my skin being pulled under the tape when I would bend. I knew I had to change the way I was doing things, or my skin would be damaged again and the whole cycle would start over.

To attempt to solve the problem, I tried something a bit unusual. I continued to use my regular Convatec wafers, but cut off all the tape on the right half. The inner circle of Durahesive material seemed to stick just fine without the tape part, but I reinforced it with little strips of 3M Medipore tape in a few strategic spots for added confidence. My skin has always liked Medipore tape, and it is very stretchy so the strips did not place tension on my skin. When I was done, my new tape and wafer method looked a bit like the sun with rays of tape sticking out.  I nicknamed it the “sunburst method.” I have now been using this method for two months and it has been working great. My skin is super happy with no more tape snake-bites and no more rash! It has held on perfectly through rock climbing, running a 10k, swimming, and even a recent three-day backpacking trip in warm weather.

This photo shows my new “sunburst method” for attaching my wafer. I trim the manufacturer’s tape away on the hip bone side of my wafer and replace it with strips of 3M Medipore tape. You can see the shine mark where my hip bone is. This new taping system completely avoids this area and my skin is no longer irritated under tape when I climb, do yoga or take part in other sports with a lot of stretching and bending movements.
Two months after starting this new taping method and my skin is still healed and happy. Unfortunately, I never took a photo of the rash. Picture hundreds of tiny red raised bumps under where the wafer tape would have been on the left side and you will get the idea.

From eating to product selection to skin care–when you first get an ostomy, everyone tells you that your situation is going to be unique and that you will have to experiment to figure out what works for you. I am only now beginning to realize how unbelievably true this. I wouldn’t be surprised if my sunburst-wafer method was a disaster for someone else even though it worked for me. The point is, make sure to try different things. Don’t settle for supplies and methods that aren’t working well for your individual needs. Keep sleuthing and find the solutions that make living with your one-of-a-kind body and ostomy comfortable.

When I was a kid I didn’t like snake bites, but I did like Nancy Drew books. Nancy would just finish solving some tough case when a new and interesting one would come her way. I have felt a bit like her lately. Now that I have solved the mystery of the itchy rash, what case is next? Last weekend while changing my appliance on the backpacking trip I just mentioned, I noticed a 1/4″ white ulcer-like depression on the side of my stoma about 1/2″ from its base. It looks just like a canker sore. My surgeon and stoma nurse both think it is trauma related, so I am experimenting with cutting my wafer differently to see if it helps. Hmmm–s0 far I haven’t noticed much of a change, but maybe if I try…..

Let the sleuthing fun begin!